H-Craft Championship hover racing game for Ubuntu


H-Craft is a futuristic hovercraft racing game which sees players compete in championships to level up and unlock new vehicles to race with.
It features 28+ racetracks, a unique driving physics simulation, a fresh design, and a challenging Championship mode.
The game, which is over 3 years old, still has pretty sharp 3D graphics with support for high resolutions, texture filtering and anti-aliasing.

The Game

Menu presentation is slick, and the gameplay is smooth and challenging – I found myself falling off the track countless times until I got used to how the hovercraft slides around. The computer competitors are fast around the track as well, and the levels are varied enough.
The developers should also be praised for their choice of music – the soundtrack is certainly fitting.
Although there are no weapons, it still reminds me very much of the popular Wipeoutseries for Sony’s PlayStation.
If development hadn’t ceased (see below) I would probably encourage Irrgheist to focus on improving re-playability, with more incentive for the player to win races and level up (other than simply getting new vehicles, most of which look the same anyway).
It wouldn’t be a bad idea to include weapon pickups either, just to give a bit of a boost to the action and show off the slick visuals with some mean explosions and other particle effects.

Trailer

There’s a trailer available to watch on YouTube, also embedded below.


Download the free demo / purchase the game

I’m not sure what the future holds for H-Craft Championship as the latest post on Irrgheist’s News Feed is dated September 1st, 2009 which leads me to believe the company may have disbanded.
The company also apparently owns and runs Indie Game Videos (http://indiegamevideos.com) but the latest video on there is nearly a year old.
Either way, you can still pick up the game for around $15.00 USD or download the free demo version for Windows or Linux and enjoy one of the best looking racing games available for Linux.
hcraft3      hcraft5     hcraft1
hcraft2     hcraft4     hcraft6

Future Blue Conky


Conky based on a "SysMetrix" theme created by Xymantix.

Install:
Extract "Conky" folder to your $HOME directory and rename it to ".Conky".
Create an entry in "Startup aplications" pointing to the "start_conky.sh" file.

(Furure Blue Conky)

Send And Recieve SMS Messages With My Computer

AndroidPC

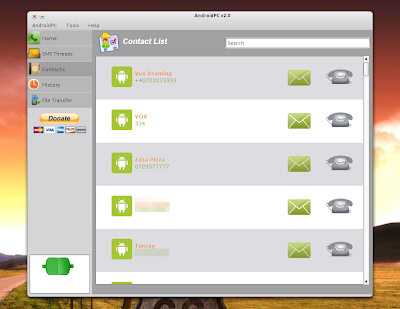
AndroidPC is a free Android application that lets you send and receive SMS messages (and notifies you when you receive new SMS messages through a popup), pickup or deny calls, send/receive files and urls, synchronize contacts with avatars and more - all from your computer. For now the application only works through WiFi. The computer part runs on Linux, Windows and Mac.


AndroidPC PC part
(The AndroidPC computer dashboard)

Even though the idea is great, AndroidPC has a few quirks: if you receive an SMS and you don't see the notification, the notification area icon doesn't change so you have to open the dashboard to see it. Also, it doesn't display notifications for calls but you can see these in the history, along with the received SMS messages. What I didn't test is the call feature so I'm not sure how that works.

AndroidPC send sms


Installation and usage


Download the Android part via the Android Store (that's a link to the new web store) and the PC part from HERE. Please note that you need JRE to install the PC part.

To use it, open the Android app, then on your computer right click the AndroidPC icon in your notification area, select "Open Dashboard" and here select "Connect to Android". The first time you you'll need to syncronize your Android device with your PC - to do this, click the "Synchronize" icon on your phone or go to or select AndroidPC > Synchronize on the AndroidPC dashboard on your computer. If you have trouble setting everything up, the Android PC website has a full how-to on this.

To add the application to startup in Linux, go to System > Preferences > Startup Applications, add a new startup program and under "Command" enter "javaws /path/to/androidpc.jnlp" (replace /path/to with the path to where you've downloaded androidpc.jnlp).

Synapse Theme For Ubuntu


Description:

GTK + 2-Emerald + metacity +icons

icons is a mix LaGaDesk-BlackWhite-III 1.5.0 by *LaGaDesk and Uni by *naf1971 All credits to original authors


Thanks to Zako for buttons in Emerald

Wallpaper by monkeymagigo:http://monkeymagico.deviantart.com/gallery/?offset=216#/d1qzwwn

Font Zero_Threes :http://www.urbanfonts.com/fonts/Zero_Threes.htm


Changelog:

27-01-2011- Add Synapse2 Emerald Theme
Add NafDesk icons for gnome


LicenseCreative Commons by-nc-nd

An overview of graphic card manufacturers and how well they work with Ubuntu


We’ve been getting some requests recently about what is the best make of graphics card to buy for use with Ubuntu, and although we aren’t a benchmarking site, and so can’t recommend specific models, what we can do is give people a brief overview of the current state of graphics drivers (both open and closed) from the different manufacturers.
Once upon a time it was an easy answer; Nvidia. Nvidia have a long history of having the best graphics drivers on Linux, albeit closed source. But today the answer is not as clear cut and it’s becoming more a personal choice depending on pros and cons for each manufacturer.

Nvidia

Nvidia are obviously one of the big two in the GPU industry alongside AMD/ATI. I believe (from reading computer mags) that their top of the range cards are currently outperforming AMD’s. But then again only a few months back AMD were outperforming across the entire price range, and I believe AMD still maintain the lead among budget cards. Anyway, I’m not going to talk too much about hardwareperformance, only to say that Nvidia and AMD are well ahead of everyone else. So what about drivers?
Nvidia provide only closed source drivers, with the exception of a very basic open source 2D only driver which until recently was used as the built-in driver for various distros (now replaced by the Nouveau driver). The closed source driver performs very well, and is generally almost on par with the Windows equivalent. Nvidia release driver updates unbelievably frequently, sometimes a few updates per-month! They also provide fast video acceleration using their VDPAU acceleration API. This is the only acceleration API supported by Adobe’s recent Flash beta. So if fullscreen HD video is something you use a lot, an Nvidia card with their own drivers may be your best bet.
Unfortunately, there are some downsides to the closed source Nvidia driver, the main one being that Nvidia still (after a few years now) do not support the Xrandr protocol which is the protocol that allows X to resize your screen resolution, or extend/clone to external monitors. This is why if you are running an Nvidia card, you can’t use Ubuntu’s built in screen resolution tool. This also causes problems with some apps that rely on Xrandr information for monitor positions. As Nvidia drivers tend to represent dual monitors to applications as one large one, sometimes a game might stretch across both rather than one (I know I’ve suffered this problem with Osmos). Another thing that Nvidia’s binary driver won’t support is kernel modesetting (KMS) and so no high-res Plymouth bootscreens – although the case is the same with most (all?) binary drivers.
On the open source side the Nouveau project have been developing 2D and 3D Nvidia drivers using reverse engineering for some time, and have made excellent progress. It’s likely now that in Natty if you have an Nvidia chip you may well get 3D acceleration straight off of a boot disk. Although performance in comparison with the closed driver is a lot worse, it’s normally good enough for simple games. One thing worth noting (if open source drivers are important to you) is that Nvidia have no intention of helping the Nouveau project with specifications, or answering questions and have made it quite clear that they are on their own.

AMD/ATI

Before AMD took over ATI, the track record of the ATI drivers was appalling. ATI drivers were notoriously buggy, and with no decent open source drivers ATI would always lose out to Nvidia if you were buying graphics hardware for Linux. That said, things are very different now.
Since AMD has taken over, the closed Linux drivers have come on in leaps and bounds. We now have regular monthly releases, and the drivers are rapidly becoming rock solid. My last big issue with the closed driver was fixed several months ago (slow minimizing/maximizing of windows when Compiz was running) and I have had no trouble since. Even better is that the closed AMD drivers support Xrandr so they integrate nicely with Ubuntu’s tools. Performance is excellent and now AMD cards tend to play nice with Wine, which never used to be the case. AMD also work with Canonical to get pre-release drivers out of the door ready for each Ubuntu release. Like the Nvidia driver, there is no KMS. The closed AMD drivers use a different video API to Nvidia called VA-API, unfortunately Adobe still hasn’t got around to supporting that, so Flash-based HD video does suffer a bit. Another drawback in comparison to Nvidia is that it takes some time for the closed AMD drivers to support new kernels and X server versions, but that shouldn’t be an issue if you use the default versions that come with an Ubuntu release.
On the open source front, AMD fair very well. Not only do AMD release card specifications to the open source community, but they also employ developers full time to work on the open source drivers. The drivers are currently undergoing a transition to the new Gallium3D framework, but that is almost complete and from now on we should start to see big improvements to the performance of these drivers. Basically, if you have an AMD card (that isn’t too recent a chipset – these things take time) you will get 3D acceleration out of the box on Ubuntu. Performance won’t be as good as the closed driver, but if that matters to you it’s just a click away. AMD really couldn’t do much more for Linux graphics driver development than they do, so kudos to them!

Intel

Intel are the open source kings of Linux graphics drivers. They only release open drivers for the platform. That means you get all the funky features like KMS, and Xrandr support. Their track-record isn’t entirely flawless though, if anyone owns a chipset based on the GMA500 you’ll know what I mean. Intel bought in a chipset from another company and rebranded it, only to find that they couldn’t develop open drivers for it. Cards with this chipset are almost unusable on a modern Ubuntu releases, apparently Intel are working on resolving that though.
The big drawback with Intel is their hardware performance is far lower than that of AMD and Nvidia, compound that with the fact that the open source driver stack has quite a lot of performance optimization to come and you may find that Intel just doesn’t cut it for games.

Summary

So, to sum up. If having open source driver support is important to you (e.g. it’ll work forever on Linux no matter what the release is), then Intel or AMD are the way to go. If performance matters (and you are on Ubuntu Gamer, so it probably does) your choices are Nvidia or AMD. In my opinion, AMD seems to just edge out because they support both the open source developers to produce a stable and compatible open driver, and also their users with a solid and fast closed driver, providing the best of both worlds.

Originally posted on Ubuntu Gamer, January 10, 2011 (Article by Luke Benstead

Divinorum-Revisited GTK 2.x Theme/Style


(Divinorum-Revisited-pack.tar.gz)
(link to page: Divinorum-Revisited-GDM Login Theme)
(link to page: OpenOffice workaround/fix by Adam St)
(link to page: Divinorum Theme by Wulax)
(link to page: Divinorum Cyan & Magenta by Fyda)
(link to page: Divinorum-Black-Blue-Green by JECHO)
(link to page: Artwiz Fonts)
MS Windows(Link To Divinorum-DX, a desktopX theme for windows)
(Artwiz-fonts TTF Format)

INSTALL DOCKY STACK UBUNTU

Docky Stacks screenshot

"Stacks" is a really cool way of browsing files from Docky. This feature is available in a separate Docky branch but luckily Ricotz has packaged and uploaded it to his Docky PPA (available for Ubuntu 10.10 Maverick Meerkat and 11.04 Natty Narwhal).


Thanks to the PPA, installing Docky Stacks is easy, but it involves some extra steps if you're using the Docky development PPA or the Elementary Art / Desktop PPAs because the Docky stacks version is older then the Docky development branch (but newer then the latest stable Docky):

A. If you're using the Docky Development PPA, use the following commands to purge the PPA:
sudo apt-get install ppa-purge
sudo ppa-purge ppa:docky-core/ppa

B. If you're using the Elementary Art or Elementary Desktop PPAs added (this does not include the Nautilus Elementary PPA!), you need to disable them temporarily. To do this, go to Software Sources (you can access this via the Ubuntu Software Center menu) and disable them. Then, remove Docky:
sudo apt-get remove docky

Once you've completed the steps above (or if you didn't have any of those PPAs added), simply copy/paste the following commands in a terminal to install Docky Stacks:
sudo add-apt-repository ppa:zeitgeist-sharp/daily
sudo add-apt-repository ppa:ricotz/docky
sudo apt-get update
sudo apt-get install docky

The Zeitgeist-sharp PPA above is only used for some dependencies which are not available in the Ricotz Docky PPA (libdbus-glib1.0-cil and libdbus1.0-cil).

Alternatively, you can download the Docky with Stacks .deb files from the PPA and manually install them. Doing so, you won't have to remove/purge any PPA but if you do this make sure you don't upgrade Docky from other PPAs as you'll lose the "stacks" feature. Also, downloading the .deb files instead of adding the PPA means you won't get any Docky Stacks updates so adding the PPA is recommended.

Install DarkVision Theme Ubuntu


Description:

DarkVision

GTK + emerald+ metacity

Wallpaper: http://pulicoti.deviantart.com/gallery/#/d36620t


Font Zero_Threes :http://www.urbanfonts.com/fonts/Zero_Threes.htm

credit to:http://gnome-look.org/content/show.php/vision+%28codename+inspiration%29?content=80064


LicenseGPL

Attack Of The Clone Theme For Ubuntu

Attack Of the Clones


Attack Of The Clones is yet another theme created by JurialMunkey (who is also behind Divergence IV: A New Hope) that features a unique Metacity theme and a very interesting combination of light and dark colors.

Attack Of The Clones requires Murrine Engine 0.98 (which is available in Ubuntu 10.10) - if you're using Ubuntu 10.04, install it using the following commands:

sudo add-apt-repository ppa:elementaryart/elementarydesktop sudo apt-get update sudo apt-get install gtk2-engines-murrine

To install the theme, download the .zip, extract it, then open the "Appearance Preferences", switch to the "Themes" tab and drag and drop the extracted .tar.gz file onto it.

Reduce the Firefox 4 menu button to an icon in Ubuntu

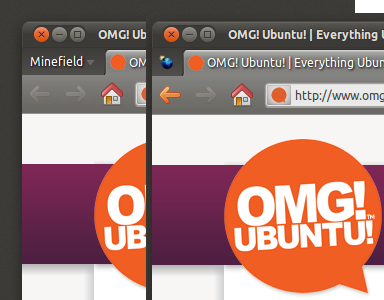
Firefox 4 comes with many new features, one of which is the introduction of a ‘menu bar’ button placed to the left of your tabs when the traditional menu bar is hidden.
For my tastes it’s too wide and unsightly, but thankfully reducing it to an ‘icon’ is a relatively easy hack and you don’t lose any functionality.
Better yet the result is far easier on the eye…
Note that I’m using Minefeild builds of Firefox 4 in these screenshots but this ‘hack’ will also work with ‘proper’ builds of Firefox 4, too.
Find the ‘userChrome.css’ file buried within your home folder, likely appearing at‘home/.mozilla/firefox-4.0/userprofile.default/chrome’.
Open the file in your text editor of choice. Paste in the following code: -

#appmenu-toolbar-button {
  list-style-image: url("chrome://branding/content/icon16.png");
}
#appmenu-toolbar-button > .toolbarbutton-text,
#appmenu-toolbar-button > .toolbarbutton-menu-dropmarker {
  display: none !important;
}
Hit save, and restart Firefox. When it re-opens you’ll see a neat icon in place of that wide text menu.

Install Google Web Fonts In Ubuntu

Google Font Directory

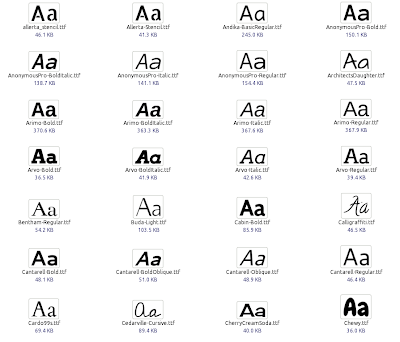
I was reading on Femtux about a Google Web Fonts package for ArchLinux and though I'd make one for Ubuntu. I didn't create a .deb but instead I've modified the original ArchLinux script to download and install all the Google Font Directory fonts on Ubuntu. You can of course manually download the fonts from HERE if you want, but using this script you can install all of them in a few seconds. The fonts included are the new Gnome 3 font, Chrome OS font, Ubuntu font and many more.

What the script does is download all the fonts from Google Font Directory (it includes around 76 fonts, each with many variations that you can use on your desktop or various designs) and installs them under /usr/share/fonts/truetype/google-fonts/ (so if you want to remove them, simply delete that folder).


To download and install all the Google Web Fonts in Ubuntu, open a terminal and type the following commands:
cd && wget http://webupd8.googlecode.com/files/install-google-fonts chmod +x install-google-fonts ./install-google-fonts
If you want to take a look at the script before running it, download it from HERE.

Once the script finishes downloading and installing the fonts, you can go ahead and try them out. If you want to use one of the Google Web Fonts for your desktop, right click your Desktop, select "Preferences" and set the new font on the "Fonts" tab.

The script creates a "googlefontdirectory" folder in the directory where you run it (your home folder if you've followed our exact instructions) - you can either delete this folder or keep it and the next time you run the script, it will only update the fonts instead of completely downloading them all over again.

Lyricsdownloader for Conky


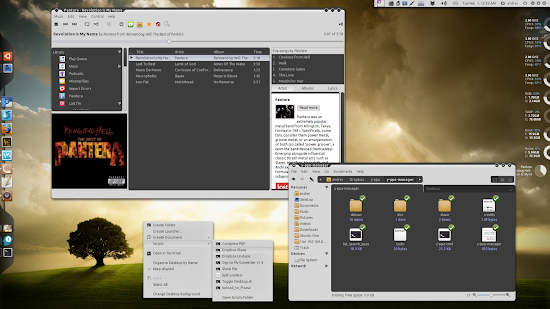
This is a python script that will download lyrics for the song playing in Amarok 1.4x, Amarok 2, Rhythmbox, Audacious, Banshee, Exaile, Gmusicbrowser, Juk, Quod Libet, Listen, Songbird, Muine, Beep Media Player, and MPD and display the lyrics on your desktop with conky.

Both the deb and the tar include an example conkyrc file. The deb installs this in /usr/share/doc/lyricsdownloader/ .

For Amarok 2, Gmusicbrowser, Songbird, Audacious, Juk, BMP, Muine, Exaile, Listen, Quod Libet, Banshee or Rythmbox support, you need python-dbus installed. For MPD support, you must
have MPC also installed. Songbird also requires the extension 'dbusbird'. If you run this from your own conkyrc, make sure that text_buffer_size is set to a high enough value or the lyrics will be cut off. In the example conkyrc it's set to 6076.

If your favorite media player is not supported, leave a comment, and I'll see what I can do.

Requirements: python, beautifulsoup, python-dbus


install BeautifulSoap
sudo apt-get install python-beautifulsoup


to run the conky type
conky -c .conkylyrics

Get the configuration for lyricsdownloader here
Get the configuration for .conkylyrics here

NOTE: The album art in the screenshots is displayed with a separate superkaramba theme for Amarok 2. It's available here: http://kde-look.org/content/show.php/Amarok+2+Simple?content=93541


(lyricsdownloader_0.9.7.tar.bz2)


(lyricsdownloader_0.9.7.deb)

Find Us On Facebook

Related Posts Plugin for WordPress, Blogger... Linux Directory