Zero Ballistics – a rather addictive native 3D tank shooter

Zero Ballistics is a 3D tank shooter, a mix of FPS and “tank” (if that’s a genre) that is actually rather addictive, although unrealistic.
The multiplayer-only (although it has support for bots), cross-platform game, which is free to download and open source, was originally developed by QuantiCode in Austria a few years ago.
It sports some pretty nice 3D graphics and a semi-destructible landscape (trees can be destroyed and they fall over rather dramatically, but buildings don’t take damange) and has a few interesting features such as upgrades to your tank, multiple views and weapons and different game modes.
Unfortunately it’s not particularly tactical – so if you were looking for a realistic tank simulator then you’ve come to the wrong place.
“Zero Ballistics is a unique blend of multiplayer first person shooter and tank combat game. Easy to learn, difficult to master was our mantra during the development of the game. Set in lush alpine environments covering all seasons, playing Zero Ballistics is as thrilling as it is relaxing.”

Getting started

Weighing in just under 60mb, the download was a breeze from Sourceforge.
After installation I ran Zero Ballistics, greeted by a nice menu I quickly found a hosted game with 5 other players – this isn’t Call of Duty: Black Ops so don’t expect millions of other players, but luckily it appears at least a dozen people are online at any one time for you to destroy and the multiplayer implementation is flawless.

Gameplay

Playing the game is easy, simply moving the tank around with the W, A, S and D keys and then controlling the turret view with the mouse seemed second nature. The graphics are nice for a 4 year old GPL game, and the resolution support is decent.
Gameplay is rather arcade-like with the tanks moving pretty quickly (everyone seemed to have six-wheeled LAV’s rather than full on tanks like the Abrams). Shooting the main turret is done with the left mouse button, machine gun with the right. It’s not entirely clear why a machine gun is necessary as it appears to have no effect on your opponents and there is a lack of infantry to gun down.
After a few kills I was presented with an upgrade screen which allowed me to choose to spend my points on my weapon, armor or speed, a nice touch.
“Explore 81 different tank setups to be ready for any given combat situation. If you want to be sneaky, use mines and the heal skill to wreak havoc among your unsuspecting enemys. You are more the frontal assault type? Combine the ram bucket and the flamethrower to eliminate your enemies up close and personal.”

Summary

Overall the game is pretty damn fun for a quick thrill, everything comes together rather nicely and presuming you can find others to play with, I’m sure some strategies would emerge.
However I’d love to see more work done on making the game a bit more realistic. All too often the battles would simply end in a cluster of tanks circling around trying to destroy each other at close range which felt like a waste when the levels are wide, open expansive spaces.
I suggest you give it a try and let us know how your thoughts in the comments!

How To Install Microsoft Office 2007 In Ubuntu (Under Wine)

Microsoft Office 2007 Ubuntu

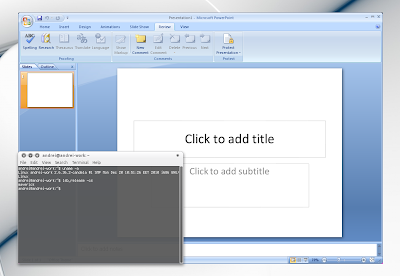
Today I had to install Microsoft Office 2007 at work. I don't like it but I had to install it because I work with storyboards (created in MS PowerPoint) and apparently these look differently in OpenOffice/LibreOffice and Microsoft Office 2007+. Since some of you are probably in the same situation as me (one way or another) and have to use Microsoft Office, I though I'd let you know how to install and get it to work in Ubuntu - the process is fairly easy but it involves a little "trick" to get PowerPoint to work.


Install and get Microsoft Office 2007 to work in Ubuntu

1. Firstly make sure you're running the latest WINE:
sudo add-apt-repository ppa:ubuntu-wine/ppa
sudo apt-get update
sudo apt-get install wine1.3

2. Go to Applications > Wine > Configure Wine and on the "Applications tab" select "Windows XP" under "Windows Version" and click "Apply".


3. Now install Microsoft Office 2007 - to be able to run the "setup.exe" installer, right click it, select "Properties" and on the "Permissions" tab check the "Allow executing file as program" box. Now double clicking setup.exe should open it using WINE. If it doesn't, right click it and select "Open with Wine Windows Program Loader". Now you can easily install Microsoft Office 2007.


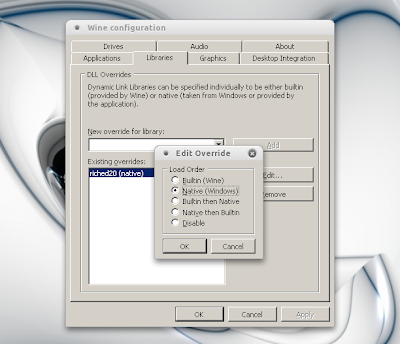
4. At this point, PowerPoint will fail to start. To fix it, go to Applications > Wine > Configure Wine and on the "Libraries" tab, under "New override for library" type: "riched20.dll", then click "Add". Now click the newly added "riched20" file, click "Edit" and select "Native (Windows)".

Wine configuration

Microsoft Office 2007 PowerPoint should now work

Create A Gnome Panel Icon For Triggering The Compiz Expo Plugin (Like In Unity)

Expo Compiz

If you've tried (or seen some video) Unity, you've surely noticed the Compiz Expo icon on the Unity dock (launcher). There is no Gnome panel applet to do this but you can do this thanks to xautomation. Here is how to replicate this behavior in any Ubuntu version, using the normal Gnome desktop.


1. Install xautomation and CCSM:
sudo apt-get install compizconfig-settings-manager xautomation


2. Set a Compiz Expo plugin key binding:

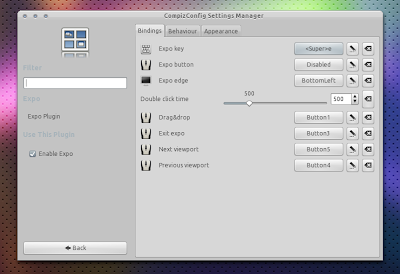
Compiz expo plugin key binding


Go to System > Preferences > CompizConfig Settings Manager and enable the "Expo" plugin. Then click it and on the "Bindings" tab, set a keyboard shortcut for the "Expo key" (first item on the list) - I've set "e" so that's what I am going to use for the commands in this post.


3. Optional: multiple desktop rows:


Compiz expo multiple desktop rows

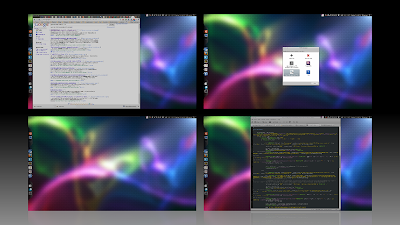
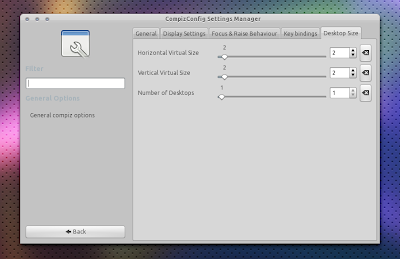
By default, expo displays one big wall, but if you want multiple rows (like in Unity - and in my screenshot), go to CompizConfig Settings Manager, click on "General options" and on the "Desktop Size" tab, set the "Vertical Virtual Size" to some number larger then 1. I've used "2" for both "Horizontal Vertical Size" and "Vertical Virtual Size".


4. Create a new custom application launcher:

Custom application launcher

Right click on a Gnome panel, select "Add to panel" and add a "Custom Application Launcher". Set the following image as its icon (this is the icon used in Unity, you can however use whatever icon you want):


Compiz expo
(save it to your computer)


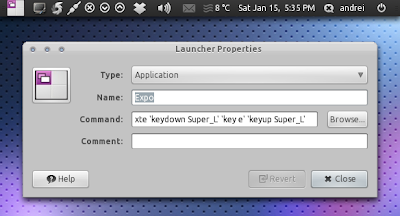
For your custom launcher name enter whatever you want and under "Command", enter this:
xte 'keydown Super_L' 'key e' 'keyup Super_L'
(This assumes you've used "e" as the Expo key binding under step 2, if not, modify it to whatever custom keybinding you've used). 


That's it! Save the custom application launcher and try it out.
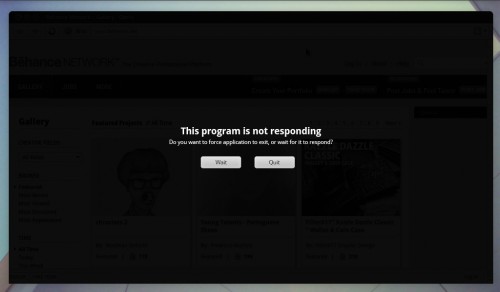
Force quitting rogue applications could do with looking better.
According to you guys that is, who often send us your ideas on how unresponsive application notifications should be shown.
Alejandro send us his ideal design, pictured above, after becoming tired of having to run ‘xkill’ yet again after an application hanged.
On his design he says “I find it much more user-friendly and better looking than a pop-window.” Looking at the ‘pop up window’ style I have to agree…
How would you like to see Force Quit dialogues displayed?

Gnome Shell - Tron Legacy


This is a GNOME Shell theme inspired by the film Tron Legacy. Icons in the screenshot are also provided.

Font used is called Zero Threes

Light Cycle wallpaper

Instructions:

Backup your /usr/share/gnome-shell/theme directory (or where ever you have GNOME shell installed).

Extract the zip file and copy the theme directory to /usr/share/gnome-shell/

Restart GNOME Shell by Alt, F2, then type r and press enter.

Icons

Icons are in the directories that correspond to your icon theme. Backup your current icon theme and replace the icons in their directories. Apps use 48x48, places use 16x16, the application switcher uses scalable and the status menu uses 16x16. Your icon themes are in either /usr/share/icons or locally ~/.icons.

Switching Fonts

To use different fonts in GNOME Shell, just open the gnome-shell.css file found in your theme directory and find lines font: 10px sans; Replace "sans" with your font name, save the file and restart GNOME Shell. You must be superuser to do this.

NOTE

I recommend a version of GNOME Shell 2.31.2 to 2.31.5(out of date but 2.31.5 is installable with most recent distros like Ubuntu 10.10 and Fedora 14). Please don't use with Git(Jhbuild), since GNOME Shell has had a re-layout.

Performance

Due to the heavy use of shadows to achieve the glow, the performance may not be smooth on some systems. This is beyond my control, however remember that GNOME Shell is still in heavy development and does not reflect the final release quality.

See the GNOME Shell group for more info.

Git re-layout version is here, WIP [link]
The following theme mock-up by ~RustedThorn may be a tad indulgent on the branding scales, and closing an application via a menu every time would get real annoying real fast, but you know what? I really don’t care. It looks beautiful.
ubuntu_theme_mockup_v3_by_rustedthorn-d36ve27
Check out the full image @ rustedthorn.deviantart.com

Install VirtualBox 4.0 Ubuntu


Virtualbox 4.0 Installer and updater
by:Nikolai Rachmaninoff, Envied Ubuntu Group.

Description:After the discrete success of the beta version of the script, I decided to prepare a stable and definitive version.The script will add the official Oracle Virtualbox repository and install Virtualbox 4.0.

Tested on:Ubuntu 10.10 (i386 and amd64);Should work on 10.04 and Linux Mint 9/10 as well.

Instructions:
1)Download the .tar.gz and unpack it.
2)Run the script by double clicking it.
3)After the Virtualbox has started you can remove the extension pack from your desktop.

More information:

VirtualBox 4.0.0 (released 2010-12-22)

This version is a major update. The following major new features were added:

* Reorganization of VirtualBox into a base package and Extension Packs; see chapter 1.5, Installing VirtualBox and extension packs, see the manual for more information
* New settings/disk file layout for VM portability; see chapter 10.1, Where VirtualBox stores its files, see the manual for more information
* Major rework of the GUI (now called “VirtualBox Manager”):
o Redesigned user interface with guest window preview (also for screenshots)
o New “scale” display mode with scaled guest display; see chapter 1.8.5, Resizing the machine’s window, see the manual for more information
o Support for creating and starting .vbox desktop shortcuts (bug #1889)
o The VM list is now sortable
o Machines can now be deleted easily without a trace including snapshots and saved states, and optionally including attached disk images (bug #5511; also, VBoxManage unregistervm --delete can do the same now)
o Built-in creation of desktop file shortcuts to start VMs on double click (bug #2322)
* VMM: support more than 1.5/2 GB guest RAM on 32-bit hosts
* New virtual hardware:
o Intel ICH9 chipset with three PCI buses, PCI Express and Message Signaled Interrupts (MSI); see chapter 3.4.1, “Motherboard” tab, see the manual for more information
o Intel HD Audio, for better support of modern guest operating systems (e.g. 64-bit Windows; bug #2785)
* Improvements to OVF support (see chapter 1.12, Importing and exporting virtual machines, see the manual for more information):
o Open Virtualization Format Archive (OVA) support
o Significant performance improvements during export and import
o Creation of the manifest file on export is optional now
o Imported disks can have formats other than VMDK
* Resource control: added support for limiting a VM’s CPU time and IO bandwidth; see chapter 5.8, Limiting bandwidth for disk images, see the manual for more information
* Storage: support asynchronous I/O for iSCSI, VMDK, VHD and Parallels images
* Storage: support for resizing VDI and VHD images; see chapter 8.21, VBoxManage modifyhd, see the manual for more information.
* Guest Additions: support for multiple virtual screens in Linux and Solaris guests using X.Org server 1.3 and later
* Language bindings: uniform Java bindings for both local (COM/XPCOM) and remote (SOAP) invocation APIs

In addition, the following items were fixed and/or added:

* VMM: Enable large page support by default on 64-bit hosts (applies to nested paging only)
* VMM: fixed guru meditation when running Minix (VT-x only; bug #6557)
* VMM: fixed crash under certain circumstances (Linux hosts only, non VT-x/AMD-V mode only; bugs #4529 and #7819)
* GUI: add configuration dialog for port forwarding in NAT mode (bug #1657)
* GUI: show the guest window content on save and restore
* GUI: certain GUI warnings don’t stop the VM output anymore
* GUI: fixed black fullscreen minitoolbar on KDE4 hosts (Linux hosts only; bug #5449)
* BIOS: implemented multi-sector reading to speed up booting of certain guests (e.g. Solaris)
* Bridged networking: improved throughput by filtering out outgoing packets intended for the host before they reach the physical network (Linux hosts only; bug #7792)
* 3D support: allow use of CR_SYSTEM_GL_PATH again (bug #6864)
* 3D support: fixed various clipping/visibility issues (bugs #5659, #5794, #5848, #6018, #6187, #6570)
* 3D support: guest application stack corruption when using glGetVertexAttrib[ifd]v (bug #7395)
* 3D support: fixed OpenGL support for libMesa 7.9
* 3D support: fixed Unity/Compiz crashes on natty
* 2D Video acceleration: multimonitor support
* VRDP: fixed rare crash in multimonitor configuration
* VRDP: support for upstream audio
* Display: fixed occasional guest resize crash
* NAT: port forwarding rules can be applied at runtime
* SATA: allow to attach CD/DVD-ROM drives including passthrough (bug #7058)
* Floppy: support readonly image files, taking this as the criteria for making the medium readonly (bug #5651)
* Audio: fixed memory corruption during playback under rare circumstances
* Audio: the DirectSound backend now allows VMs to be audible when another DirectSound application is active, including another VM (bug #5578)
* EFI: support for SATA disks and CDROMs
* BIOS: reduce the stack usage of the VESA BIOS function #4F01 (Quake fix)
* OVF/OVA: fixed export of VMs with iSCSI disks
* Storage: Apple DMG image support for the virtual CD/DVD (bug #6760)
* Linux host USB support: introduced a less invasive way of accessing raw USB devices (bugs #1093, #5345, #7759)
* Linux hosts: support recent Linux kernels with CONFIG_DEBUG_SET_MODULE_RONX set
* Guest Additions: Shared Folders now can be marked as being auto-mounted on Windows, Linux and Solaris guests
* Linux Additions: Shared Folders now support symbolic links (bug #818)
* Linux Additions: combined 32-bit and 64-bit additions into one file
* Windows Additions: automatic logon on Windows Vista/Windows 7 is now able to handle renamed user accounts; added various bugfixes

Changelog:

03/01/2011
-The script has been updated to version 1.1.Now the script downloads the extensionpack and installs it by opening it with Virtualbox.
04/01/201
-Code corrected to v.1.2.


(Virtualbox 4.0 Installer)

Source GnomeLook

Install RaveH20 4 GTK Theme Ubuntu


The RaveH20 Team is very proud to announce the immediate release of:
The RaveH20 4 GTK GUI Theme Codename:"Danger Days" This Version has been in development for over 9 mouths! And sees a major overhaul and cleanup in practically all areas of this GTK theme.

The RaveH20 4 Theme Aims to be an Original (As in Originality and Uniqueness) and beautiful Shiny Theme. Meaning it doesn't try to mimic,copy or by any means ripoff other Themes or Operating System GUIs. It only tries to be a unique beautiful first class version of it's self. Its also aims to a 100% Free and Legal Theme For Linux,BSD and any other OpenSource desktops, useing GTK, Gnome , XFCE , LXDE or other desktops, It does not use artwork or graphics Stolen or taken from unauthorized sources, RaveH20 4 Only includes content Licensed Under the GPL/LGPL (v.2) Created by Us or others! You "should" be safe in distributing or modifying RaveH20 4 for your own commercial or personal needs. So feel free to use RaveH20 4 in your own distribution, Community,Commercial or Personal Etc. *We cannot make any legal warranty to this however as we are a group of volunteers.*


This GTK GUI Theme Provides Windows Borders and a Unique Widget Theme (GTK2 + Metacity Theme) it works on the Gnome,XFCE,LXDE and other GTK Based desktops!

RaveH20 4 GTK GUI Theme comes in two versions:

1.) Night Edition - A Dark Theme with a Beautiful Shiny Black Panel
2.) Lights Edition - A Light Theme with a Beautiful Shiny White Panel
(!) We recommend you use both the Icon theme and the GTK theme in parallel (together)
Night Edition Icons go with Night Edition GTK GUI Theme(This)

Grab the RaveH20 4 Icon Theme! (seen in the image and ment to go with this theme) now out!

Here: http://gnome-look.org/content/show.php?content=119776

Created By The RaveH20 Team! The Open Source Theme Team!

(see are Website)
http://www.iravefuzion.blogspot.com


If you would like to submit fixes or other changes please email us

at: iravefuzion@gmail.com

Please gives us feedback! we are a community project that trys its best to listen to you! :) you may report bugs bellow or by emailing us (preferd)

HEY! If you like the theme please spread the word (by linking to are blog or this page) we a community project that you can be a part of! see are website for details


Changelog:

Major overhaul and cleanup in practically all areas of the theme both the Icon and the GTK Themes. This Theme is 100% GPL!
This theme is fully compatible with the icons theme! This means Dark or Light Themes available!

(INSTALL)

You can Install this theme on any open source desktop with the Gnome or XFCE Desktop. (or any GTK for that Matter)

EZ (Howto Install)

1.) Right Click on Desktop
2.) Click Change Background
3.) Click on the themes tab
4.) Drag The Theme Package you just downloaded to the theme window, to auto install!
(!) Download Includes pre-packed Theme, Change log and howto install (Advanced) Methods.

Hey! What Version Do I Want?:

1.) Night Edition - A Dark Theme with a Beautiful Shiny Black Panel
2.) Lights Edition - A Light Theme with a Beautiful Shiny White Panel

(!) Pre-Packed in this theme's Tar file is comprehensive and easy to fallow install instructions and alot more documentation about it! check it out!

Easy PDF Instructions Coming soon!


(RaveH20 4 GUI Theme Night Edtion (any distro)

(RaveH20 4 GUI Theme Lights Edtion(any distro)

(RaveH20 4 GUI Theme Night (Mirror 1)

(RaveH20 4 GUI Theme Lights (Mirror 1)

Source UbuntuArt

BlackWhite Icon Collection Ubuntu


Source GnomeLook

Install Sabily 9.10 (Gaza) - Video

Assalamo alaykom, Kindly find in the following video how to install Sabily 9.10 (Gaza)..step by step...

Source Sabily.com

Sabily Magazine - Coming Soon

 In order to spread Sabily, Sabily Promotion Team from Malaysia already decide to publish a Magazine of Sabily call "Edaran Sabily" mean Sabily distribution.  It is iniative from Sabily Malaysian Team to spread Sabily to their nation. In this case the magazine will be in Malaysian language. Hopefully soon they will translate it to English then publish it. The magazine soon can be downloaded from Sabily Malaysia homepage. Print version is under consideration depend on reader request.
    In this case they now calling for volunteer especially from Malaysia or Indonesia to participate in their magazine project to be a writer and graphic designer for specific article that they would like to publish in the second issue of the magazine soon. The magazine will cover  more topic about Sabily, a little about Ubuntu and other distro, Open source, latest news, Community activity, games, programming, Tips, Q & A, etc.
    So if you have talent and interest to participate, you should sent your application to edaransabily@gmail.com tell which areas of interest.What are you waiting for?

Here is sample screenshot of the "Edaran Sabily" magazine cover.

Don't forget to get it soon..

Marqeaux' Ubuntu Wallpaper Quartet 2


Source UbuntuArt


Update: How To Install 13 Stunning Themes From Bisigi in Ubuntu


If you want to install Bisigi themes in Lucid or Karmic, there is an even easier method. Check this link 

Add GPG Key First
  • Open Terminal and copy-paste the following line.
sudo apt-key adv --recv-keys --keyserver keyserver.ubuntu.com 0x1781bd45c4c3275a34bb6aec6e871c4a881574de
  • Done.
Now Add The Repo
  • Open sources.list file first. Do the following command in Terminal
sudo gedit /etc/apt/sources.list
  • Now, depending on the version of Ubuntu you use, copy-paste the following repo to the sources.list file, preferably to the last line.
For Ubuntu 9.10 Karmic

sudo apt-key adv --recv-keys --keyserver keyserver.ubuntu.com 0x1781bd45c4c3275a34bb6aec6e871c4a881574

For Ubuntu 9.04 Jaunty

sudo apt-key adv --recv-keys --keyserver keyserver.ubuntu.com 0x1781bd45c4c3275a34bb6aec6e871c4a881574
deb http://ppa.launchpad.net/bisigi/ppa/ubuntu jaunty main 

For Ubuntu 8.10 Intrepid

sudo apt-key adv --recv-keys --keyserver keyserver.ubuntu.com 0x1781bd45c4c3275a34bb6aec6e871c4a881574
deb http://ppa.launchpad.net/bisigi/ppa/ubuntu intrepid main 

For Ubuntu 8.10 Hardy

sudo apt-key adv --recv-keys --keyserver keyserver.ubuntu.com 0x1781bd45c4c3275a34bb6aec6e871c4a881574
deb http://ppa.launchpad.net/bisigi/ppa/ubuntu hardy main 
  • Done.
Update Repositories to Include the Changes
  • Do the following in Terminal.
  • sudo apt-key adv --recv-keys --keyserver keyserver.ubuntu.com 0x1781bd45c4c3275a34bb6aec6e871c4a881574
sudo apt-get update
  • Done.
And Finally, Installing of Bisigi Themes
  • To install all the 12 Bisigi themes for Ubuntu Gnome in one go, just open Terminal and copy-paste the command.
sudo apt-key adv --recv-keys --keyserver keyserver.ubuntu.com 0x1781bd45c4c3275a34bb6aec6e871c4a881574
    sudo apt-get install zgegblog-themes
    • Now in order to download themes of your choice, here are the name of the themes with corresponding commands on the right side.
    sudo apt-key adv --recv-keys --keyserver keyserver.ubuntu.com 0x1781bd45c4c3275a34bb6aec6e871c4a881574


      AquaDreams:                      sudo aptitude install aquadreams-theme
      Ubuntu Sunrise:                   sudo aptitude install  ubuntu-sunrise-theme
      Bamboo-Zen:                      sudo aptitude install bamboo-zen-theme
      Step into Freedom:               sudo aptitude install step-into-freedom-theme
      Tropical:                             sudo aptitude install tropical-theme
      Exotic:                                 sudo aptitude install exotic-theme
      Balanzan:                            sudo aptitude install balanzan-theme
      Wild Shine:                          sudo aptitude install wild-shine-theme
      Infinity:                                sudo aptitude install infinity-theme
      Showtime:                           sudo aptitude install showtime-theme
      Orange:                              sudo aptitude install orange-theme
      Ellanna:                              sudo aptitude install ellanna-theme

      Links
      http://www.bisigi-project.org/

      Install World of Padman Ubuntu

      Popular first person shooter World of Padman has received a much-awaited new release which brings the 6 year old game up to version 1.5.
      The game, originally started in 2004 as a modification of Quake III: Arena, is an open source cross-platform shooter loosely based on the Padman comic strip for the magazine Playstation Games which originated in the 1990s.
      The current iteration of the game now runs on an enhanced version of the ever-so-prominent ioquake3 engine to deliver some updated slick visuals which compliment the fun gameplay.
      Version 1.5 brings a heap of new changes as the announcement boasts:
      “Countless things have been revised and partly modified. There is a new game type, new maps, new player models, a new weapon, new powerups and much more. You might be in for some surprises.”

      Download it now

      You can grab the latest version of World of Padman for Ubuntu by heading over to the official announcement and choosing a mirror.
      Be warned, the download is 900mb!

      Install Xonotic Nexuiz Ubuntu 10.10

      Xonotic, a fork of popular and graphically beautiful first person shooter Nexuiz, has had its first preview release, 0.1.
      Nexuiz has been around a while and is well known as being one of the nicest looking games available to run natively under Linux. The open source project hasn’t had a release since late 2009, and many speculate that the project is officially dead.
      Not wanting to leave such a great game untouched and let it sink into the ground of the vaporware graveyard, the Xonotic project was born. Promising new features, graphics, physics and maps (not prescription medicine as the name suggests), they are determined to inject new life into the stranded FPS.
      “The last release of Nexuiz (2.5.2) was on the first of October 2009, and when we decided to fork early March 2010 we continued where we had left off with Nexuiz. Large parts of the code, graphics and music have been redone and have improved immensely. In over a year we have managed to make huge progress on pretty much every part of the game.
      However this release is still a preview, which means that bugs are likely to exist and that some of our decisions turn out to have unwanted side effects.”

      What’s new?

      Today, the project released a preview, Xonotic 0.1, which sees a whole host of new stuff added, as well as a heap of bugs as one should expect from such an early release. This is of course great news for Linux FPS fans who have been following the project eagerly awaiting some news.
      The new release sees features such as:
      • Performance and graphics improvements
      • A new dynamic and configurable HUD
      • New informative cross hairs
      • New game menu
      • Tweaks to physics and weapon balance
      • New player models and animations
      • New maps
      • Client authentication and encryption
      Phew! Quite the changelog.
      For the complete list of changes and a detailed description of each, you should direct your browsers to the press release and have a read.

      Download it now

      You can grab the game from these handy dandy links.
      Download via torrent
      Download via HTTP
      md5sum: aafb43893aa66e01488c817e3a60d96d

      Gwibber’s new look interface

      It feels an age since we last mentioned anything related to Gwibber but, thankfully, there’s a reason for that.
      Back in July last year Ubuntu’s Neil Patel created some superb designs for a ‘new look’ Gwibber. Designs so ace that they are being turned into reality, as Gwibber creator Ryan Paul told us when we interviewed him back in August: -
      “I’m sure some OMG! readers have already seen the excellent mock-ups by Neil Patel (here) of his proposal for a next-generation Gwibber interface.
      When we implement those mock-ups, we are going to be using native widgets, which will hopefully help improve our performance considerably.”
      Whilst the entirely redesigned shebang isn’t ready to try out just yet a few tantalizing demos, prototypes and tests are available to see – including this one of a new look ‘posting box’
      So,  for now, grab yourself a bib and drool over this short video demo of what might end being your new favourite text entry field…
      image
      source OMG! Ubuntu

      Install Atolm (Borderless Elementary, GTK Theme Updates) Ubuntu 10.10

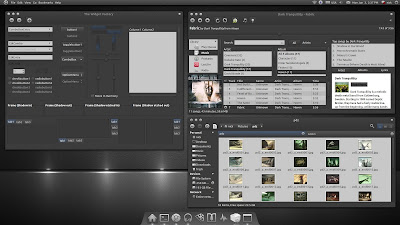
      Atolm

      Atolm, the new but already popular dark theme created by the Orta author has been updated yesterday. Here's the changelog for Atolms 0.6.5:

      • Speed optimizations, the theme is now faster than Orta
      • Notebook spacing changed.
      • Notebook tabs changed.
      • Nautilus breadcrumbs and mode button improved.
      • Check, radio buttons and tabs now share the same coloring with buttons.
      • White arrows on spinbuttons fixed.
      • Ubuntu Software Center text colors fixed.
      • Emesene status button text color fixed.
      • Pidgin status toggle button text color fixed.
      • Various Evolution Fixes.
      • OpenOffice text visibility fixes.

      Download Atolm


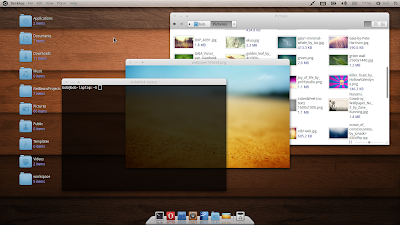
      Borderless Elementary


      Borderless Elementary

      Borderless Elementary is just a modified Elementary theme which looks very slick thanks to the removal of the borders and smaller widgets. This theme is ideal for a netbook, but looks great on any screen resolution.


      Download Borderless Elementary

      Source Webup8 

      Install HandBrake 0.9.5 Ubuntu 10.10

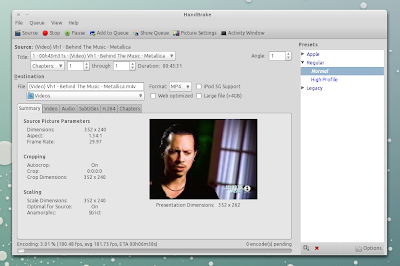
      Handbrake 0.9.5 screenshot

      Handbrake is a multithreaded video transcoder that supports any DVD-like source and most multimedia file it can get libavformat to read and libavcodec to decode.

      Even though it's not its first aim, Handbrake is used by many as a DVD ripper and it was voted as "best Linux DVD ripper" by the WebUpd8 readers.


      Handbrake 0.9.5 was released today, bringing some very interesting new features and improvements:
      • BluRay disc structure support. (No decryption support)
      • Updated Libraries (x264, ffmpeg)
      • SSA Subtitle support (including burn-in)
      • MP3 audio now supported in MP4 files
      • VOBSUB subtitle now supported in MP4 files
      • Updated Presets for newer devices and better quality
      • AC3 encoding support.
      • Improved DVD Main Feature detection (when using dvdnav)
      • Universal audio downmix support (all audio types can be downmixed)
      • Point*to*Point encoding (second or frame start and end times)
      • Batch Scan (Scan Multiple files at once)
      • Many Bug fixes and UI improvements.

      A complete changelog is available @ Handbrake forum.

      Install Handbrake 0.9.5 in Ubuntu

      Add the Handbrake PPA and install Handbrake 0.9.5 in Ubuntu 9.10 Karmic, 10.04 Lucid and 10.10 Maverick using the following commands:
      sudo add-apt-repository ppa:stebbins/handbrake-releases
       sudo apt-get update
        sudo apt-get install handbrake-gtk

      For other Linux distributions, Windows and Mac OSX downloads, visit the Handbrake downloads page.

      Find Us On Facebook

      Related Posts Plugin for WordPress, Blogger... Linux Directory