LiquidFM Mod

Increase Quality by Adding an Antenna. Kensington's LiquidFM is a device that transmit audio from my Ipod to my car radio.
The transmission quality suffers especially in crowded areas. By adding an antenna to it, one could enhance the signal strength and therefore get a better sound into your card radio. Checkout the video tutorial for the details.

Install SuperTuxKart Games in Ubuntu 10.10


It’s here, racing fans – a brand new version of iconic Linux game ‘SuperTuxKart’ is now available for download.
SuperTuxKart 0.7, which has been in development for over a year, sees some great new features and improvements added to the game, including: -
  • New graphics engine
  • New GUI
  • New Kart and track animations
  • New and improved tracks, karts, and items
  • Shortcut/alternative way support for tracks
  • Asian font support
  • Bugfixes

Download

Dying to get your racing helmet on? You can nab the latest release by adding the following PPA (in bold) to your software sources.
To do this using a Terminal enter: -
sudo add-apt-repository ppa:stk/dev
sudo apt-get update && sudo apt-get install supertuxkart

Launch Via Applications > Games > SuperTuxKart
Alternatively you grab the source @ sourceforge.net/projects/supertuxkart

RhythmCat - A music player with lyric show

RhythmCat is a music player which can be running under Linux. It can be used as a normal music player, and it can also show lyrics in a single window, or even on the desktop. It can help you mix your voice into the original music. And this player can help you convert the format of your music files, or cut/join your music…

Install RhythmCat in ubuntu
Download deb packages from here once you have deb packages you can install them by double clicking on it.

Force Quit Option Ubuntu 10.10


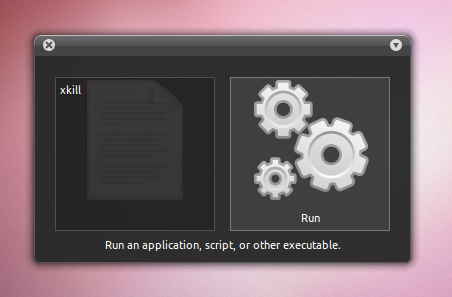
“Arrrrrrgh” said the bear with the sore head when trying to run ‘xkill’ in Unity. “Why doesn’t pawing ALT + F2 work in here?!”.
It’s something which I know has perplexed, bamboozled and annoyed the frell out of many readers who have upgraded to Ubuntu 10.10 Unity.
Thankfully it’ll be one of the many things fixed in Unity come 11.04 but, if you can’t wait until April 2011 to flex your fingers, here are some alternative ways to run commands, launch apps and stretch those digits using ALT+F2.
Knut.photo © 2009 Martin Teschner | more info(via: Wylio)

1. Do it with GNOME-Do

Gnome-Do can open, launch and execute a whole world of wonders when called – search google, send text to pastebin, upload photos or just launch an application. For those who desire some visual slickness in their launcher Do is the undisputed choice.

2. Take Alawalk for a walk

Launch your applications/command whilst using very little memory with Alawalk.
And by ‘very little memory’ I mean very little – Alawwhich uses barely above 65KiB of RAM when in use.
Alawalk comes with many-a plugin from Google search to Tweeter. It uses a custom set of commands for a few things but all is explained in the ‘Read Me’ file included in the download.

3. Run with Gmrun

Another work around to the lack of ALT+F2 freshness is by use of Gmrun – a small dialogue window that can be configured to show on shortcut.
Gmrun has terminal-style TAB completion amongst other standard fare. Unlike other entries in this list it doesn’t use window controls.
Gmrun can be installed via the Ubuntu Software Centre.

4. GRun

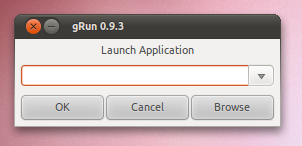
Want your launcher to have automatic auto-complete (as opposed to tab completion)? gRun steps up to the challenge. It’s small, can be configured to run on a keyboard shortcut and, whilst lacking some of the advanced features others in the list can claim, it does have a ‘memory’ for swift access to your most commonly used commands.
grun in Ubuntu Unity
gRun can be installed via the Ubuntu Software Centre.

5. Be lazy, use the terminal

Finally if none of the candidates bring balm to your each keyboatd-shortcut-loving fingers there is always the terminal ready and waiting. Add it to your Unity launcher for quick access and et voila – problem almost solved.
There. No need to stress out too much Mr Bear. Maybe you should go find whoever broke in to your house, ate your porridge and slept in your bed before stealing your prize collection of Ubuntu release CD’s, hmm?

Compiz Config Settings 3

Zorin Splash Screen Manager

both

If you want a simple Plymouth manager to easily change, install and remove Plymouth themes, try the the new Zorin Splash Screen Manager.

Besides options to install / remove and change the Plymouth theme, Zorin Splash Screen Manager also allows you to change the theme text (for a text mode Plymouth).

Compiz Config Settings 2

Install Linux Sabily - Ubuntu with Islamic Applications


Sabily is a free, open source operating system designed by and for Muslims. It is based on the popular Ubuntu Linux distribution which is a free, efficient and secure operating system. Unlike Microsoft Windows and other proprietary systems, Linux is publicly open and extendible by contributors.


Because Sabily is free, already includes all software you need in your everyday tasks, and is customized specifically for Muslims. And even if you didn't buy Windows, you should not use pirated copies because then you are still supporting Microsoft by adding to the impression it's the only OS available.


Sabily includes a set of packages that customizes the Ubuntu distro; Ubuntu is easy to use for a novice user, with the most-used Office, Internet, Graphics and Video applications already installed. With Sabily, Muslim users have “out of the box” Islamic software and tools installed as well. Sabily includes Islamic software (prayer times tool, Quran study tool, Hijri calendar etc.) and has a custom design. Sabily comes with out of the box educational software, codecs for the most used media formats and has better support for Arabic language.


Install Sabily from DVD

 Follow these steps if you don’t have any operating system installed on your computer
Download and burn the DVD: Download Links
Learn how to verify that your DVD download is ok: HowToMD5SUM
Learn how to create a DVD from your newly downloaded file: BurningIsoHowTo
If you can’t download the DVD, you can buy it here.
Then install it as a standard Ubuntu CD (documentation).
See the support page if you need help.

Convert a standard Ubuntu installation

Follow these steps if you already have installed Ubuntu on your computer
If you have an old version of Ubuntu, less than 9.10, you should first upgrade your system:
sudo aptitude update && sudo aptitude safe-upgrade
sudo aptitude dist-upgrade
Then, to convert Ubuntu to Sabily, follow these steps:
Open a terminal window (Applications→Accessories→Terminal), and execute the following command:
sudo add-apt-repository ppa:sabily.team/ppa && sudo apt-get -q update
sudo apt-get install sabily
Answer ‘Yes’ when needed.
Finally, restart your computer to apply changes.
See the support page if you need help.

Run Sabily in Virtual Box

Follow these steps if you want to run Sabily on top of another operating system
Virtual Box is a virtualization software, that means you can execute a "guest" operating system on top of a "host" operating system. For example, if you have Windows installed on your computer, you can run Sabily like an application on Windows. No need to burn a DVD with Sabily, then to install it on your computer... So if you are afraid to lose data by installing Sabily on your computer, or if you just want to quickly test it, install Virtual Box, download the Sabily image and execute it!
Here are the detailed instructions:
  • Download and install VirtualBox here
  • Download the Sabily image here (download both files, .vmdk and .ovf)
  • Launch virtualBox and select "import virtual appliance", then browse to the .ovf file you downloaded (the .ovf file and .vmdk must be in the same folder)
  • Review the machine settings (especially memory, it is set to 512MB, but you can increase it if you have more memory) and launch it.
  • Log in using:  username -> test, password -> S)bilY  (the keyboard is set to qwerty by default)
See the support page if you need help.

Install TweetDeck 0.36 Ubuntu - Adds Real-Time Streaming


Download TweetDeck 0.36 | Adobe Air installation instructions for Ubuntu 

Compiz Config Settings

Install Dropbox in Ubuntu 10.10

Dropbox is a one among the best online file syncing tool available out there. And unlike Ubuntu One, my other favorite file syncing tool, Dropbox is cross platform as well. So here is how you install Dropbox in Ubuntu 10.04 "Lucid Lynx" and Ubuntu 10.10 "Maverick Meerkat".


How to Install Dropbox in Ubuntu Lucid, Maverick

  • Download Dropbox Nautilus client first. Both 32bit and 64bit versions of the DEB file are available. Download Dropbox.
  • Double-click on the downloaded file to install it. Remember, while you install Dropbox in your Ubuntu, automatically a new Dropbox repo is added to your sources.list. That will come in handy for future Dropbox updates.
Software Center Repositories
  • As you can see, it shows "lucid" instead of "maverick"(since I am using ubuntu 10.10 beta). So I am not sure if the updates are going to work in Ubuntu 10.10 with this 'Lucid' Dropbox repo. But the Dropbox client is definitely working fine in my Ubuntu 10.10 beta.
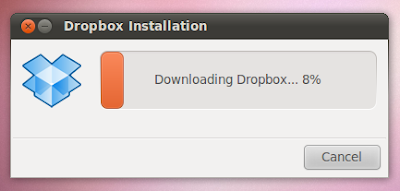
  • You must be prompted with an option to restart Nautilus by now. Restart Nautilus and then launch Dropbox. Applications - Internet - Dropbox. And you will be asked to download a 'proprietary daemon'. See screenshot.
Dropbox in Ubuntu
  • Click OK to download Dropbox daemon.
Dropbox in Ubuntu
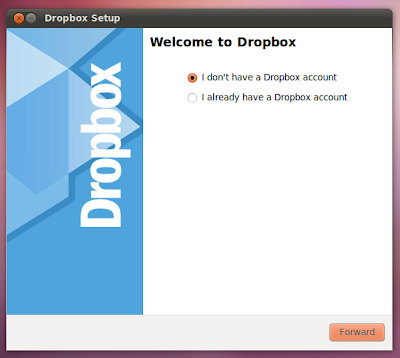
  • After downloading is done, you will be prompted with an option to 'sign up with Dropbox'.
Dropbox in Ubuntu
  • If you haven't signed up with Dropbox yet and if you are interested in an offer for 250MB of free extra storage from Dropbox, you may visit the 'PS' section below post. Otherwise, just go through the steps by clicking 'Forward'.
  • After finishing the installation process, you will notice a new Dropbox icon on your top panel. You can use it as your launchpad for all Dropbox related needs.
Dropbox in Ubuntu
  • Done. Though Dropbox is an awesome file syncing tool, I will never recommend syncing your very personal stuff in some server cloud. Otherwise, it's just cool.

Fix! Can’t Play Full-screen YouTube Video In Ubuntu Maverick 10.10


If you installed Ubuntu Maverick on a old computer with Intel graphics chipset, you will find that you won’t be able to watch YouTube video in full screen, regardless which browser you are using. Apparently, the problem lies with the embedded Flash player conflicts with the hardware acceleration.
For those who are having this problem, here’s the fix:

1. Disable hardware acceleration

1. Open your browser and go to YouTube.com. Start playing your video.
2. Right click on the video and click Settings.
youtube-flash-settings
3. On the flash popup, uncheck “Enable Hardware Acceleration”. Click Close.
youtube-flash-disable-acceleration
Restart your browser and play the video in full screen mode.

Overriding GPU validation

If the above trick does not work, here’s what you can do:
Open a terminal and type the following command:
sudo mkdir /etc/adobe
echo "OverrideGPUValidation=true" >~/mms.cfg
sudo mv ~/mms.cfg /etc/adobe/

Start your browser and play the video in full screen. It should work now.

Other options

If you are using Firefox, you can install the FlashVideoReplacer extension. It replaces the flash player with movie player and is able to play the video in full screen and in HD quality.

Find Us On Facebook

Related Posts Plugin for WordPress, Blogger... Linux Directory