INSTALL DOCKY STACK UBUNTU

Docky Stacks screenshot

"Stacks" is a really cool way of browsing files from Docky. This feature is available in a separate Docky branch but luckily Ricotz has packaged and uploaded it to his Docky PPA (available for Ubuntu 10.10 Maverick Meerkat and 11.04 Natty Narwhal).


Thanks to the PPA, installing Docky Stacks is easy, but it involves some extra steps if you're using the Docky development PPA or the Elementary Art / Desktop PPAs because the Docky stacks version is older then the Docky development branch (but newer then the latest stable Docky):

A. If you're using the Docky Development PPA, use the following commands to purge the PPA:
sudo apt-get install ppa-purge
sudo ppa-purge ppa:docky-core/ppa

B. If you're using the Elementary Art or Elementary Desktop PPAs added (this does not include the Nautilus Elementary PPA!), you need to disable them temporarily. To do this, go to Software Sources (you can access this via the Ubuntu Software Center menu) and disable them. Then, remove Docky:
sudo apt-get remove docky

Once you've completed the steps above (or if you didn't have any of those PPAs added), simply copy/paste the following commands in a terminal to install Docky Stacks:
sudo add-apt-repository ppa:zeitgeist-sharp/daily
sudo add-apt-repository ppa:ricotz/docky
sudo apt-get update
sudo apt-get install docky

The Zeitgeist-sharp PPA above is only used for some dependencies which are not available in the Ricotz Docky PPA (libdbus-glib1.0-cil and libdbus1.0-cil).

Alternatively, you can download the Docky with Stacks .deb files from the PPA and manually install them. Doing so, you won't have to remove/purge any PPA but if you do this make sure you don't upgrade Docky from other PPAs as you'll lose the "stacks" feature. Also, downloading the .deb files instead of adding the PPA means you won't get any Docky Stacks updates so adding the PPA is recommended.

Install DarkVision Theme Ubuntu


Description:

DarkVision

GTK + emerald+ metacity

Wallpaper: http://pulicoti.deviantart.com/gallery/#/d36620t


Font Zero_Threes :http://www.urbanfonts.com/fonts/Zero_Threes.htm

credit to:http://gnome-look.org/content/show.php/vision+%28codename+inspiration%29?content=80064


LicenseGPL

Attack Of The Clone Theme For Ubuntu

Attack Of the Clones


Attack Of The Clones is yet another theme created by JurialMunkey (who is also behind Divergence IV: A New Hope) that features a unique Metacity theme and a very interesting combination of light and dark colors.

Attack Of The Clones requires Murrine Engine 0.98 (which is available in Ubuntu 10.10) - if you're using Ubuntu 10.04, install it using the following commands:

sudo add-apt-repository ppa:elementaryart/elementarydesktop sudo apt-get update sudo apt-get install gtk2-engines-murrine

To install the theme, download the .zip, extract it, then open the "Appearance Preferences", switch to the "Themes" tab and drag and drop the extracted .tar.gz file onto it.

Reduce the Firefox 4 menu button to an icon in Ubuntu

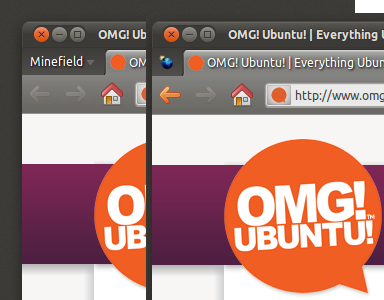
Firefox 4 comes with many new features, one of which is the introduction of a ‘menu bar’ button placed to the left of your tabs when the traditional menu bar is hidden.
For my tastes it’s too wide and unsightly, but thankfully reducing it to an ‘icon’ is a relatively easy hack and you don’t lose any functionality.
Better yet the result is far easier on the eye…
Note that I’m using Minefeild builds of Firefox 4 in these screenshots but this ‘hack’ will also work with ‘proper’ builds of Firefox 4, too.
Find the ‘userChrome.css’ file buried within your home folder, likely appearing at‘home/.mozilla/firefox-4.0/userprofile.default/chrome’.
Open the file in your text editor of choice. Paste in the following code: -

#appmenu-toolbar-button {
  list-style-image: url("chrome://branding/content/icon16.png");
}
#appmenu-toolbar-button > .toolbarbutton-text,
#appmenu-toolbar-button > .toolbarbutton-menu-dropmarker {
  display: none !important;
}
Hit save, and restart Firefox. When it re-opens you’ll see a neat icon in place of that wide text menu.

Install Google Web Fonts In Ubuntu

Google Font Directory

I was reading on Femtux about a Google Web Fonts package for ArchLinux and though I'd make one for Ubuntu. I didn't create a .deb but instead I've modified the original ArchLinux script to download and install all the Google Font Directory fonts on Ubuntu. You can of course manually download the fonts from HERE if you want, but using this script you can install all of them in a few seconds. The fonts included are the new Gnome 3 font, Chrome OS font, Ubuntu font and many more.

What the script does is download all the fonts from Google Font Directory (it includes around 76 fonts, each with many variations that you can use on your desktop or various designs) and installs them under /usr/share/fonts/truetype/google-fonts/ (so if you want to remove them, simply delete that folder).


To download and install all the Google Web Fonts in Ubuntu, open a terminal and type the following commands:
cd && wget http://webupd8.googlecode.com/files/install-google-fonts chmod +x install-google-fonts ./install-google-fonts
If you want to take a look at the script before running it, download it from HERE.

Once the script finishes downloading and installing the fonts, you can go ahead and try them out. If you want to use one of the Google Web Fonts for your desktop, right click your Desktop, select "Preferences" and set the new font on the "Fonts" tab.

The script creates a "googlefontdirectory" folder in the directory where you run it (your home folder if you've followed our exact instructions) - you can either delete this folder or keep it and the next time you run the script, it will only update the fonts instead of completely downloading them all over again.

Find Us On Facebook

Related Posts Plugin for WordPress, Blogger... Linux Directory