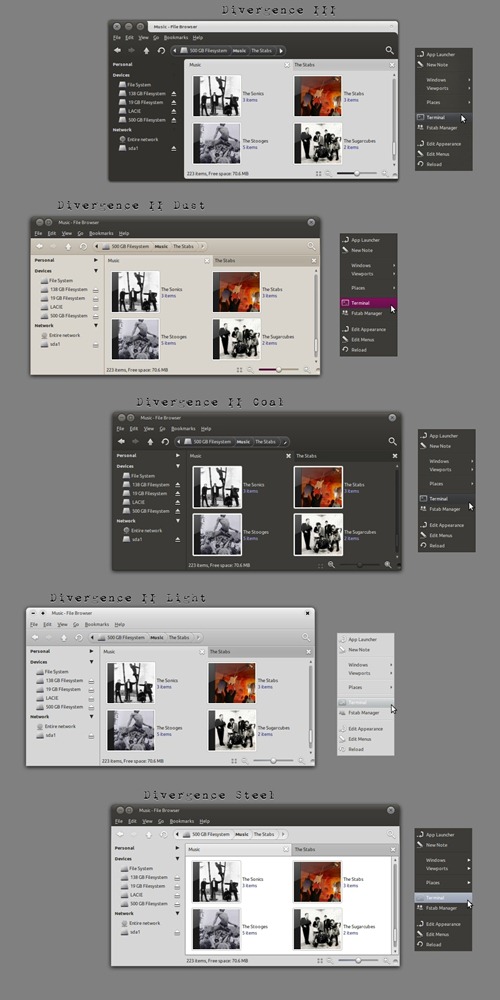
All credit to the creators of Elementary Milk.

Extract file and copy folder.

then in terminal:

gksu nautilus /usr/share/windowbuttons/themes/

and paste the folder into the directory.

(elementarymilkwindowbutton)

Divergence Theme Pack


Well, it’s easy to achieve thanks to designer ~jurialmunkey who has packaged them up into one ‘mega-pack’ for easy download and installation.
divergence_mega_pack_by_jurialmunkey-d301oik

Download

The Divergence theme set is available to download in one giant ‘megapack’ @: -

Requirements

To get your apps looking like the screenshots above you do need to install Nautilus Elementary, the latest Murrine & Equinox GTK engines and the Awoken icon set.
The megapack contains: -
  • various spins of the Divergence theme (Steel, Dust, Coal, Light, etc)
  • Metacity
  • Emerald
  • AwOkaenza icon theme, inheriting many icons from AwOken
  • Awn Theme

PPA’s

Latest Equinox GTK engine:
sudo add-apt-repository ppa:tiheum/equinox
sudo apt-get update && sudo apt-get install gtk2-engines-equinox
Latest Murrine GTK engine:
sudo add-apt-repository ppa:murrine-daily/ppa
sudo apt-get update && sudo apt-get install gtk2-engines-murrine
Nautilus Elementary:
sudo add-apt-repository ppa:am-monkeyd/nautilus-elementary-ppa
sudo apt-get update && sudo apt-get upgrade
nautilus -q
Open Nautilus > Edit > Preferences > Tweaks > Enable breadcrumbs, disable places button.
AwOken Icon Theme:
sudo add-apt-repository ppa:alecive/antigone
sudo apt-get update && sudo apt-get install awoken-icon-theme

Installation

Installing the megapack is a breeze; download and extract the .zip file above and run the ‘install.sh’ script inside either by double-clicking on it and choosing ‘run in a terminal’ or issuing the following command in the correct directory via the terminal: -
sudo ./install.sh

inSSIDer 2 - Wi-Fi Scanner Tool For Ubuntu

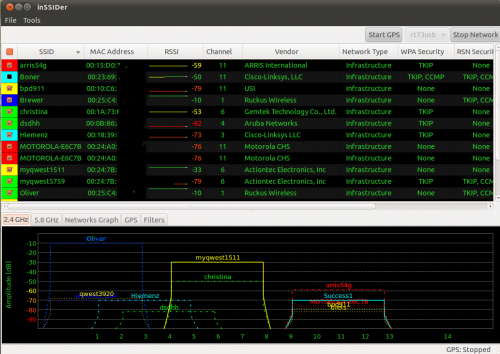
The first Linux release of  award-winning open-source Wi-Fi scanner tool inSSIDer 2 has been made available for download.

inssider linux
inSSIDer scans any network(s) available to your WiFi card/dongle and tracks the signal strength over time – even if you’re not connected to it. This makes it an invaluable tool when deciding on a network to join or for detecting performance issues with your own network.

Download

As this release is of alpha quality it is not recommended for users dependant on the use of a stable WiFi scanning tool.
Pre-packaged .deb files are available for both 32bit and 64bit Ubuntu @ github.com/metageek-llc/inSSIDer-2-Cross-Platform/downloads

CONKY-colors 5.0b2-2 Ubuntu


DO NOT UPGRADE TO CONKY 1.8.1, IT WILL BREAKS ALL PYTHON SCRIPTS AND MESS ALL CONKY
Now it's easy to customize your desktop!

Conky is a free, light-weight system monitor for X, that displays any information on your desktop.

CONKY-colors is an easier way to configure Conky.

This conky script support multilanguage:
Bulgarian, English, German, Italian, Polish, Portuguese, Russian, Spanish and Ukrainian

How to install
Go to a terminal and type:
$sudo apt-get install aptitude python-statgrab ttf-droid hddtemp curl lm-sensors conky-all
$sudo chmod u+s /usr/sbin/hddtemp
$sudo sensors-detect #answering Yes (default) to all questions, even that last one that defaults to No

Now restart your session

Download and extract the conky-colors.tar.gz and type in terminal in the same directory that has been extracted.
$make
$sudo make install
$conky-colors {options}

Ex: if your cpu is quad-core and you want the noble color, with hd, network and pidgin monitor and all in portuguese
conky-colors --theme=gnome-noble --lang=pt --cpu=4 --network --hd=default --pidgin

For a working weather script you NEED to define, in a user specific config file, a partner id and registration code for the weather.com xoap service. For this purpose copy .conkyForecast.config in /usr/share/conkycolors folder to your home and setup as required.

bbcweather widget don't need any kind of registration

For a working photo widget you need to specify a file or directory in conkyPhoto or conkyPhotoRandom script in ~/.conkycolors/bin/

Update your font cache:
$sudo fc-cache -v -f

+++ Kaivalagi's Scripts (Included in conky-colors) +++
Conky Weather Script: http://ubuntuforums.org/showthread.php?t=869328
Conky SSL Mail Script: http://ubuntuforums.org/showthread.php?t=869771
Conky Pidgin Script: http://ubuntuforums.org/showthread.php?t=969933&highlight=pidgin+conky
Conky Rhythmbox Script: http://ubuntuforums.org/showthread.php?t=928168&highlight=conky+rhythmbox
Conky Banshee Script: http://ubuntuforums.org/showthread.php?p=7683570
Conky Exaile Script: http://ubuntuforums.org/showthread.php?t=926041
+++ If you can, say thanks to him for this great work +++

If you choose --todo option, create a file called ToDo.txt in your home and open /usr/share/conkycolors/bin/task file to install this script. This one will help you to easy add and remove tasks

finaly, alt+f2 and type conky.

To run conky at startup, go to System > Preferences > Startup Applications, click "Add" and add the path to the conkyStart file[/usr/share/conkycolors/bin/conkyStart]

that's all folks!

Source(conky_colors)
SUSE(CONKY-Colors (opensuse buildservice))
Ubuntu(Conky Hardcore PPA)
Ubuntu(Conky 1.8.0)


Sabily Al-Quds - Network File Sharing

Sharing file or folder between computer is very important service that should have in any operating system included Sabily. Other than sharing by using network hub or switch, if you only have two PC, you still can network it two by connected network cable between them. Sharing on network is more better than sharing by using USB Flash drive in case for less and fast job.
Lets see how I share folder in Sabily with other operating system for example WindowsXP. In this case I am using network switch since I have three PC connect to it for Internet line sharing. This example for sharing folder after you had success installed Sabily operating system.

01. Right click on the folder that you want to share on network. Tick on "Share this folder". Since this is first time to make folder sharing, we need to install Windows network sharing service. Just click on "Install service" button.
02. It will download package file. Make sure your Internet line is good. 
03. Then the software will be install automatically. 
04. Finish installation. Close the "Changes applied" window. 
05. Restart your session. 
06. Now you can share it. 
07. Icon show that the folder is shared. 
Now you can see it on any Windows operating system under network place.

Find Us On Facebook

Related Posts Plugin for WordPress, Blogger... Linux Directory