Change timeout delay for Sudo command password in Ubuntu

Ubuntu default disable the root user and sudo runs the command needs super privilege.When you first run a sudo command,it asks for the login user password and it won’t ask again in 5 minutes,because the terminal remember the password for 5 minutes (the default timeout).This tutorial will show you how to change this default sudo command password timeout.

Edit sudoers.tmp using this command in Applications -> Accessories -> Terminal:

gksudo gedit /etc/sudoers
 
find the line says:
 
Defaults env_reset
 
change it into
 
Defaults env_reset , timestamp_timeout=x

here change “x” to the minutes you want the terminal remember.

Note:You can set “x” to -1,so that the terminal will remember sudo password until you log-out or close this terminal window.To force terminal ask password again when running sudo command,use:

sudo -K

HQ real-time Earth wallpaper for Ubuntu: XPlanetFX

Forever a fan of quirky wallpapers that breaks the tradtion of static tedium we call desktop wallpaper, I was bowled over when tipped off to XplanetFX – a themeable real-time wallpaper that puts the Earth, Moon and Sun on your desktop in stunning high-quality.

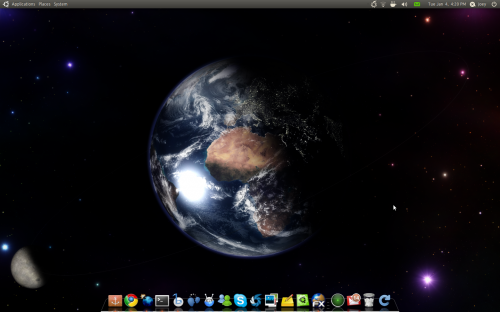
xPlanetFX in Ubuntu 10.10

The default theme
XPlanetFX is incredibly customizable, coming with a sizeable array of options and settings sure to make even the most hard-to-please tweaker feel in- control.
Download extra themes; position the ‘Earth’ anywhere you like within the wallpaper frame; enable options for realistic cloud rendering or real-time lighting; set it to auto-run on login; the list could go on.
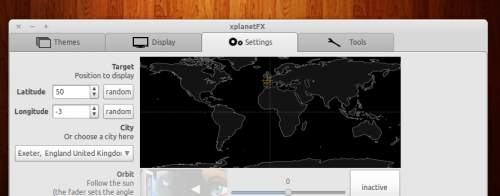
Setting your location for accurate real-time representation of light and Earth movment is a fantastic touch, and one made a breeze thanks to the simple ‘City Selection’ menu.
Alternatively you can also set your location by placing the green cross-hair marker as near to your desired/chosen/actual location on the (I want to say War Games style) world map.

Rendering

This wonderful graphic made by the applications’ author shows off the HQ visual features present in XPlanetFX. The attention to detail present is superb; click the image below to view in better detail.
xplanetFX features
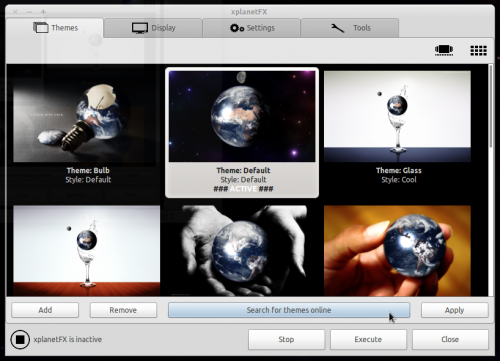
Back to the themes now and whatever your GTK+ style you’re sure to find something complimentary. Hit the ‘Search for themes online’ button to view available themes and to download in-app. Apply them by selecting them with your mouse from the main theme display window and pressing ‘Apply’.
XPlanetFX themes
Note: Since posting this earlier today the server containing the extra ‘themes’ has been taxed greatly by all you eager folks! If you are experiencing connection issues this is the likely reason.

Download

So it looks good but how easy is it to install? ‘Very’ is the answer, thanks to a nicely pre-packaged .deb for Ubuntu users.
Hit the link below to grab it. Double click on it to install.
Download XplanetFX for Ubuntu
Once installed launch from the ‘Applications > Accessories’ sub-menu.
Setting it as your wallpaper
The first time you run XPlanetFX you may do what I did: frantically hit the ‘apply’ button exepcting instant results only to be left a few minutes later with nothing happening. This is actually a patience issue rather than an application issue; it can take a few minutes (depending on your CPU speed) for XPlanetFX to ‘render’ your desired wallpaper and set it on your desktop.
If you find that things are going too slow try disabling some of the rendering options (such as Clouds) located at the bottom of the ‘Display’ tab in XPlanetFX’s preferences.
Resource usage
Sadly such beauty doesn’t come without a cost; XPlanetFX likes to quaff CPU and hog a bit of RAM. Neither are to any drastic extent but low-powered device users (such as those on a netbook) may find that it’s not the ideal drape to have running when sans charger.
In all XPlanetFX is the most stunning, well designed ‘animated’ wallpaper I’ve so far come across. If you can withstand the ever-so slight resource hit running it costs then my advice is to do it: it’s exceptionally well made.
NodokaC - Metacity Theme


Description:
This theme is a small attempt to make one good (convenient) desktop instead of thousands beauty but... ugh,.. useless (sic! :( ) themes.

So I added colours to one of standard FC theme - Nodoka. It simply makes window buttons much MORE VISIBLE. Something alike was made in http://fedora-art.org/content/show.php/Saturglass?content=106292 and, for XFCE by me athttp://xfce-look.org/content/show.php/MicrodeckC?content=137469

Thus I present NodokaC.

I build it for myself using standard metacity xml. New button colours are given inside metacity-theme-1.xml in web-#HHHHHH format. Feel free to look in metacity-theme-1.xml and change it if you like. Search-and-replace should help you change it in every place where needed. Other colours are tuned via gtk-theme as usual.

Install: 
Download file and unpack into ~/.themes folder. Archive contains also files from original Nodoka theme for convenience. Select theme NodokaC for metacity using standard measures of distro (smth. like gnome-appearance-properties->Modify->Window->Select from the list). 
Effect is immediate (for my F10).


Changelog:

v.0.0 Original version. TODO: edit icons bitmaps to increase icons contrast and visibility.

v.0.1. Added alternate colour for "unmaximize" button (see screenshot). I edit icon bitmaps for better visibility


source UbuntuArt

Get Caps / Num / Scroll Lock Keys NotifyOSD Notifications Using Compiz And A Script

lock keys notifications

Using this tweak you will get NotifyOSD notification bubbles when the caps lock, num lock or scroll lock status changes (you press a lock key).


One way of getting NotifyOSD notifications when you press the Caps Lock, Num Lock and Scroll Lock keys is using Indicator Keylock - which displays the lock keys status using both NotifyOSD and an appindicator.

But if you only want NotifyOSD notifications, you can do this without installing Indicator Keylock - by using a patched NotifyOSD provided by Leolik, a script and Compiz. This is a tweak Antoni "Pinguy" is using in his latest Pinguy OS 10.10 and he shared this tip with us so you can use it even if you don't want to install Pinguy OS.


How to set up and use the Lock Keys script

1. Optional: install the patched NotifyOSD we've talked about a while back - this makes the notifications respect the timeout passed by the script. Without this package, the notifications will be displayed for 10 seconds which is annoying in some occasions.

sudo add-apt-repository ppa:leolik/leolik
sudo apt-get update && sudo apt-get upgrade
sudo apt-get install libnotify-bin
pkill notify-osd

2. Download the script from HERE and save it somewhere on your system (like a "scripts" folder in your home directory for example). Then right click the file, select "Properties" and on the "Permissions" tab, check the "Allow executing file as program" box.

3. Make sure you have CompizConfig Settings Manager installed:
 
sudo apt-get install compizconfig-settings-manager


compizconfig settings manager commands tab

Go to System > Preferences > CompizConfig Settings Manager, enable the "Commands" plugin (if not already enabled) and on the commands tab, for 3 empty command boxes, enter this:

/path/to/lock_keys caps
/path/to/lock_keys num
/path/to/lock_keys scrl

In the above commands, replace "/path/to/lock_keys" with the exact path to where you've save the lock_keys script (downloaded in step 1).

4. On the same CompizConfigSettings Manager Commands plugin, go to the "Key Bindings" tab and for the "Run command X" corresponding to each command enter under step 3 press the "disabled" button, then press "Grab key combination" and press the key corresponding to the command (caps, num or scroll lock). When assigning a key such as Caps Lock, Num Lock or Scoll Lock, after pressing the key, press ENTER or else Compiz will not assign the key and will wait to press some more keys!

Compizconfig settings manager key bindings

And you're done!

Find Us On Facebook

Related Posts Plugin for WordPress, Blogger... Linux Directory