How To Import Winamp Equalizer Preset Into Linux Audio Players Like Audacious, XMMS, etc


Linux users always miss out on one feature that their Windows counterparts enjoy while listening to music. Most of the time, while listening to music using music players like Audacious, BMP, XMMS, etc in Linux, users misses out the equalizer presets that is present in most of the Windows music players like of Winamp, iTunes, Windows Media Player, etc.
For any die-hard music-aficionado who loves to listen to music and cannot compromise with quality, can never forgive a player that doesn’t comes with an equalizer preset. If you are a music lover who don’t likes to compromise with music and likes to have equalizer presets for fine tuning his music, there’s a simple trick to import the Winamp equalizer presets into your Audacious, BMP, XMMS, etc Linux music players.
Simply follow the steps below:
Run the following commands one by one in your terminal and you will have the equalizer presets of Winamp in your favorite Linux music player.
terminal
Step 1Download the Winamp equalizer presets using the following command in your terminal:

wget http://www.beastwithin.org/users/wwwwolf/code/xmms/winamp_presets.gz
Step 2: Import the downloaded Winamp equalizer presets into Audacious, BMP, and XMMS respectively using the commands as follows:

gunzip -c winamp_presets.gz > ~/.config/audacious/eq.preset
gunzip -c winamp_presets.gz > ~/.bmp/eq.preset
gunzip -c winamp_presets.gz > ~/.xmms/eq.preset
winamp equalizer presets imported in audacious
In case you don’t need all of them or haven’t installed any of the above mentioned player then you don’t have to run the command for that player. For example, if you don’t have BMP installed in your machine, then you don’t have to execute the command gunzip -c winamp_presets.gz > ~/.bmp/eq.preset into your terminal.

Install Jdownloader in Ubuntu 10.10/10.04/9.10 using Ubuntu PPA

JDownloader is open source platform independent and written completely in Java. It simplifies downloading files from One-Click-Hosters like Rapidshare.com or Megaupload.com - not only for users with a premium account but also for users who don’t pay. It offers downloading in multiple paralell streams, captcha recognition, automatical file extraction and much more. Of course, JDownloader is absolutely free of charge. Additionally, many “link encryption” sites are supported - so you just paste the “encrypted” links and JD does the rest. JDownloader can import CCF, RSDF and the new DLC files.
Install Jdownloader in Ubuntu 10.10/10.04/9.10


Open the terminal and run the following command
sudo add-apt-repository ppa:jd-team/jdownloader
sudo apt-get update 
sudo apt-get install jdownloader

compiz-fusion-plugins-extra

This is the full list of compiz packages I have installed (Intrepid):

compiz
compiz-core
compiz-dev
compiz-fusion-plugins-extra
compiz-fusion-plugins-main
compiz-fusion-plugins-unsupported
compiz-gnome
compiz-gtk
compiz-plugins
compiz-wrapper
compizconfig-backend-gconf
compizconfig-settings-manager
emerald
gnome-compiz-manager
libcompizconfig0
libemeraldengine0
libgnome-compiz-manager0
python-compizconfig

Ubuntu Tips And Tricks : Compiz Fusion

Compiz Fusion is available as a separate Windows Manager, to allow advanced desktop effects such as the rotating cube desktop. Many Ubuntu users choose to run Compiz, which is quite fast in Ubuntu. 
Install:

sudo apt-get install compiz compizconfig-settings-manager compiz-fusion-plugins-main
compiz-fusion-plugins-extra emerald librsvg2-common
To change to Compiz as the Window Manager:
System -> Preferences -> CompizConfig Settings Manager
Note: You must logout and log back in for the change to take effect.

Fusion Icon

Fusion Icon is a tray icon that allows you to easily switch between window managers, window decorators, and gives you quick access to the Compiz Settings Manager. This allows quick toggling of 3-D desktop effects (that may not be compatible with some applications).

sudo apt-get install fusion-icon
Applications -> System Tools -> Compiz Fusion Icon
You can then easily access CompizConfig Settings Manager from the icon.


Rotate the Compiz Cube


Set the CompizConfig Settings Manager to enable the "Desktop Cube" and "Rotate Cube" and "Viewport Switcher" options. Click on the icon for each to customize settings. For example, to change the appearance of the cube, click on the Desktop Cube icon to access its settings. You can set the hotkey buttons for rotating the cube in the "Viewport Switcher" settings. Otherwise, hold down the Ctrl+Alt+Left mouse button and drag the mouse (or touchpad) the direction you want to rotate the cube.
Remember, the cube rotates between desktops. It's not a cube unless you have at least 4 desktops running. You will not get a cube if you are only using 2 desktops (you will get a "plate"). You can still rotate the sides of the plate, of course, but it will not be a cube. (Recent users from the Windows OS may have no experience with the concept of simultaneous desktops, but they are nice once you learn how to use them).
When running Compiz fusion as the Windows Manager, you must change the default number of desktops from within CompizConfig Settings Manger. To enable 4 desktops:
CompizConfig Settings Manager -> General -> General Options -> Desktop Size -> Horizontal Virtual Size -> 4
When you start an application, you can assign it to any one of the 4 desktops by right-clicking the upper left corner of the application window and choosing the "To Desktop..." option. Rotating the cube shows the different desktops. You can also go to a desktop using the taskbar icon which shows the 4 desktop.

Fix Low Screen Resolution At Start UP


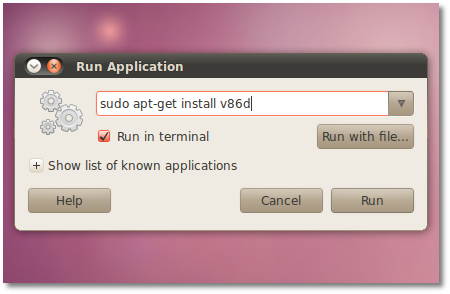
Step 1: Hit the ALT+F2 key combination, paste the following command and check the "Run in terminal" option:

sudo apt-get install v86d

...a terminal window will appear. Enter your password when asked, hit the Enter key and wait for the package to be installed. The terminal window will automatically close!

Review image


Step 2: Hit the ALT+F2 key combination, paste the following command and check the "Run in terminal" option:


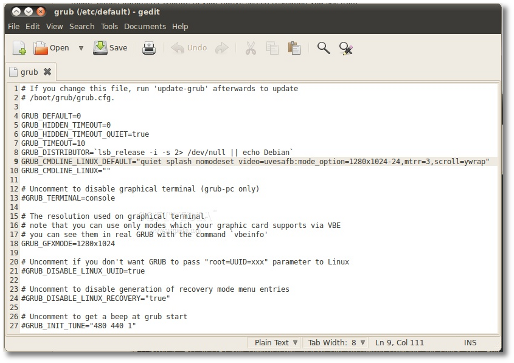
gksu gedit /etc/default/grub

...enter your password when asked and hit the Enter key.

- Replace the following line (line number 9):

GRUB_CMDLINE_LINUX_DEFAULT="quiet splash"

with this one:

GRUB_CMDLINE_LINUX_DEFAULT="quiet splash nomodeset video=uvesafb:mode_option=1280x1024-24,mtrr=3,scroll=ywrap"


- Replace the following line (line number 18):

#GRUB_GFXMODE=640x480

with this one:

GRUB_GFXMODE=1280x1024

The file should look like this:
Review image
Save the file and close it!


Step 3: Hit the ALT+F2 key combination, paste the following command and check the "Run in terminal" option:

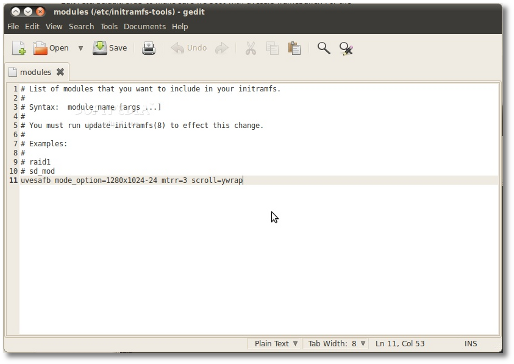
gksu gedit /etc/initramfs-tools/modules
When the text window appears, add the following line at the end of the file:

uvesafb mode_option=1280x1024-24 mtrr=3 scroll=ywrap

It should look like this:
Review image

Save the file and close it!

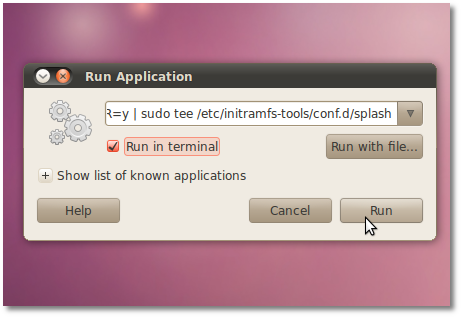
Step 4: Hit the ALT+F2 key combination, paste the following command and check the "Run in terminal" option:

echo FRAMEBUFFER=y | sudo tee /etc/initramfs-tools/conf.d/splash


...a terminal window will appear for a second or two. The terminal window will automatically close!
Review image

Step 5: Hit the ALT+F2 key combination, paste the following command and check the "Run in terminal" option:


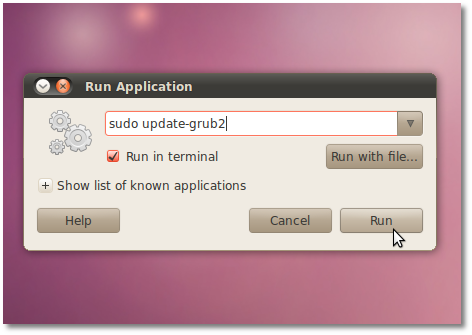
sudo update-grub2

...a terminal window will appear. Enter your password when asked, hit the Enter key and wait for the command to finish. The terminal window will automatically close!
Review image

Step 6: Hit the ALT+F2 key combination, paste the following command and check the "Run in terminal" option:


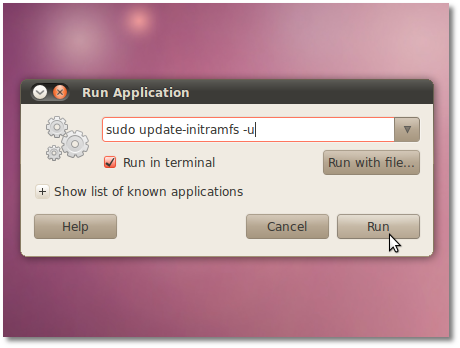
sudo update-initramfs -u
...a terminal window will appear. Enter your password when asked, hit the Enter key and wait for the command to finish. The terminal window will automatically close!
Review image

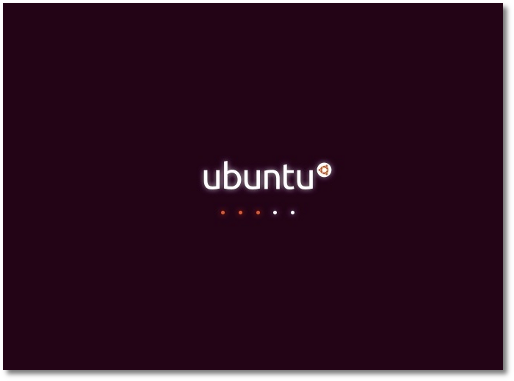
Step 7: Reboot your computer. When the system starts, you should see a better looking Ubuntu logo!
Review image

Public Key Is Not Avaiable

When you getting this problems usually when you update:

The following signatures couldn't be verified because the public key is not available: NO_PUBKEY 54422A4B98AB5139
The solution is simple.Take the first key you have problem with, for example E635A714505A2DD1, take the last 8 symbols (in this case - 505A2DD1) and run the following in the terminal:

gpg --keyserver keyserver.ubuntu.com --recv 505A2DD1
gpg --export --armor 505A2DD1 | sudo apt-key add -
Then repeat this step with every problematic key.

What to do after install Ubuntu 10.04LTS

1) Update Driver
Does the hardware on your Ubuntu system need proprietary drivers work at peak performance?  Today we take a look how easy version 10.04 makes it to install them.

Ubuntu 10.04 finally automatically recognizes and installs drivers for most hardware today, it even recognized and configured Wi-Fi drivers correctly every time in our tests.  This is in contrast to the past, when it was often difficult to get hardware to work in Linux.  However, most video cards still need proprietary drivers from their manufacturer to get full hardware video acceleration.
Even though Ubuntu doesn’t include any non-open source components, it still makes it easy to install proprietary drivers if you wish.  When you first install and boot into Ubuntu, you may see a popup informing you that “restricted” drivers are available.
image

You may see a notification asking you if you’d like to install optional drivers from your graphics card manufacturer when you try to enable advanced desktop effects.  Click Enable to directly install the drivers right there.
image

Or, you can select the tray icon from the first popup, and click Install drivers.
image        
Alternately, if the tray icon has disappeared, click System, then Administration, and select Hardware Drivers.

image
This will open a dialog showing all the proprietary drivers available for your system, which may include drivers for your video card and other hardware depending on your computer.  Select the driver you wish to install, and click Activate.
image

Enter your password, and then Ubuntu will download and install the driver without any more input.  After installation you may be prompted to reboot your system.
image

Now, you should be able to take full advantage of your hardware, including fancy desktop effects with hardware acceleration.

If you ever wish to remove these drivers, simply re-open the drivers dialog as above, select the driver, and click Remove.  Once again, a reboot may be required to finish the process.
image

How To Install Ubuntu 10.04LTS

Find Us On Facebook

Related Posts Plugin for WordPress, Blogger... Linux Directory