GNOME Shell Workspace Indicator Extension

Gnome Shell Workspace Indicator

Here is yet another new GNOME Shell extension which I'm sure you'll find very useful: Workspace Indicator. The extension works in the same way as Indicator-Workspaces for Gnome 2: it displays your your current workspace number on the panel and lets you switch to a different workspace.

The extension has another "hidden" but interesting feature: it changes the workspace on scroll over the Workspace Indicator.

To install it, firstly install git-core. In Ubuntu, run this:


sudo apt-get install git-core
Then, to install Workspace Indicator GNOME Shell extension, run the following commands:

cd && git clone https://github.com/erick2red/shell-extensions.git
cd shell-extensions
mkdir -p ~/.local/share/gnome-shell/extensions #just in case
mv workspace-indicator@erick.red.gmail.com/ ~/.local/share/gnome-shell/extensions/


Update: Erick (the Workspace switcher Shell extension developer) has changed how the extension works so now you must compile it to be able to install it. To make things easier, I've archived a working Workspace Indicator so you can download it from HERE - to install it, extract it to ~/.local/share/gnome-shell/extensions/ (make sure the Workspace Indicator GNOME Shell extension folder is called "workspace-indicator@erick.red.gmail.com").

Then reload Gnome Shell.

Note: I've only tested the extension using the latest GNOME Shell from GIT and GNOME Shell 3.0.1 under Fedora 15.

Written by in Web Upd8

‘Conky Colors’ 7.0

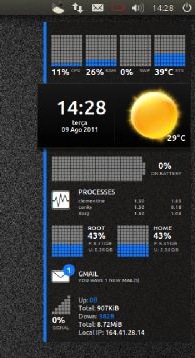
User-friendly Conky setup Conky Colors has added a new ‘stylish lightening stats‘ mode as part of its 7.0 release. 


“SLS” mode provides CPU and system process usage, weather conditions, GMail alerts, HDD usage, battery, and network statistics.
Other modes included with Conky Colors, but not new to this release, are ‘Rings’, ‘Board’, ‘Default’, ‘Slim’, and ‘Cairo’.
Also making up the 7.0 release are three new “themes” (the colours used for the various modes), script changes and general stability improvements.

Download

Download link and full instructions on setting up Conky Colors can be found at the author of Conky Color’s Deviant Art page @ helmuthdu.deviantart.com
To save some time on the first step, all you need to install can be done by clicking the button below: -


Skype Ubuntu Messaging Menu / NotifyOSD Integration

Skype Notifications Ubuntu


There's a very old thread @ Ubuntuforums which includes a python script to get NotifyOSD notifications for Skype. Since the first post, the python script has been improved by many users and it now provides both Ubuntu Messaging Menu integration (with all the features the Messaging Menu provides like the envelope icon changing color when you have a pending notification, etc.) as well as NotifyOSD notifications for Skype.

Using the script on Ubuntu Forums involves manual setup and the instructions are pretty clear but there are quite a few steps to follow. Also, the thread doesn't provide info on what dependencies you may need to install to get it working. So I've made a script which sets up most of the stuff automatically, however you still have to add a command in the Skype options manually to get it to work.

If you prefer to do this the manual way, download the improved Skype Notify by not_insane from UbuntuForums and follow the instructions inside. For an somewhat automated way, follow the instructions below.


Get Messaging Menu / NotifyOSD integration for Skype in Ubuntu 11.04 or 10.10


Before continuing, please note that I've only tested this with Ubuntu 11.04 Natty Narwhal 32bit (with Unity) as well as Ubuntu 10.10 32bit and it worked but it probably won't work with other Ubuntu versions! Also, I cannot guarantee this will work - if it doesn't (and it doesn't involve my installation script), you can ask for support @ Ubuntuforums.


1. Running the following commands, you'll download my script which will automatically set up everything (mostly). So open a terminal and copy/paste the commands below:

wget http://webupd8.googlecode.com/files/skype-notify-messaging
chmod +x skype-notify-messaging
./skype-notify-messaging

The script will now ask what you want to do. Enter 1 to install Skype notifications / Messaging Menu support or 2 to remove it:

Skype script


2. Now you must set up Skype - this only requires 3 clicks and a command you must copy/paste in the Skype options.

Open Skype, log in and in its options (click the Skype logo on the bottom left corner of the Skype window and select "Options), under "Notifications" click "Advanced View":

Skype Options notifications


Then check the "Execute the following script on any event" box and under it, paste this:

python /usr/share/skype-notify-improved/skype-notify.py -e"%type" -n"%sname" -f"%fname" -p"%fpath" -m"%smessage" -s%fsize -u%sskype

Here's a screenshot:

Skype options notifications


Then click "Apply".


3. Now log out from Ubuntu, log back in and start Skype from the Messaging Menu (envelope icon), not from some other place like Dash, etc! Oh, one more thing: you won't get any notifications if your status is set to Do Not Disturb.


4. Authorizing the scripts with Skype.


The first time you'll receive a notification (like for instance when someone writes something to you and the window is minimized: then you'll get the popup to authorize the scripts), a window will pop up asking for permission to use the Skype API:

Skype authorization

Here, check the "Remember this selection" box, then "Yes" and you're ready!


5. Optional:  since Skype now shows up in the Ubuntu Messaging Menu, you may want to blacklist it from showing up on the notification area (Ubuntu 11.04). To do this, install dconf-tools:
sudo apt-get install dconf-tools

Then press ALT + F2 and enter: "dconf-editor", navigate to desktop > unity > panel and under "systray-whitelist", remove skype but leave the rest of applications.


Removing the Skype Messaging Menu / NotifyOSD integration


Ubuntu 11.04+ only: If you want to remove the Skype Messaging Menu integration, run the script again (step 1 in this post) and this time enter "2" when prompted instead of "1".

Then once again go to Skype options, under "Notifications" click "Advanced View" and uncheck the Execute the following script on any event box.


Credits for the Skype Messaging Menu / NotifyOSD integration go to Lightbreeze, Ned Hoy, not_insane and everybody else who contributed to this.
 
Written by in Web Upd8

Nord: A Beautiful Glassy GNOME Shell Theme

Nord is a new glassy GNOME Shell theme based on Zukitwo, created by WebUpd8 reader rAX.

The theme is currently in beta and there are some known bugs but it already looks great, featuring some unique elements like the switches which look amazing (see the screenshots). If you use GNOME Shell, you must really give it a try!


Here are a few screenshots:

Nord GNOME Shell theme

Nord GNOME Shell theme

Nord GNOME Shell theme

Nord GNOME Shell theme


To use Nord, either extract it in the ~/.themes/ folder and use GNOME Tweak Tool or ThemeSelector GNOME Shell extension to apply the theme or rename the extracted folder from "gnome-shell" to "theme" and replace the /usr/share/gnome-shell/theme folder.

Download Nord GNOME Shell theme

Written by in Web Upd8

Conky Lunatico Rings

Conky Lunatico Rings is a really nice Conky configuration based on Conky Orange which displays rings for the CPU, memory, disk and network usage, in the form of gauges.


You can download Conky Lunatico Rings from HERE.


Because there were some spacing issues on my system, I've tweaked the configuration a bit so it looks like this:

Conky Lunatico Rings
(Using the original configuration, it looks like this on my system)


But maybe the original Conky Lunatico Rings works better on your computer (it's most probably related to the font configuration) so try the original firstly. If you want my tweaked version, you can get it from HERE


Because the wireless ring is useless for me, I've removed it - so if you don't want the wireless part and don't know how to do it, you can download my modified Conky Lunatico Rings without wireless from HERE. Here's a screenshot with this config:

Conky Lunatico Rings


But you can of course tweak it some more by yourself, it's really not that difficult.


Usage


Firstly, install Conky. In Ubuntu, use the following command in a terminal:
sudo apt-get install conky

To use Conky Lunatico Rings, you'll need to install the Ubuntu font - this is already available on your system if you use Ubuntu 10.10+ or you can manually download it from font.ubuntu.com.

Then, download Conky Lunatico Rings (links above), extract the downloaded archive, create a folder called ".conky" in your home directory and move the "conky_lunatico.lua" and "conkyrc_lunatico" files into this folder.

And finally, run it using the following command:
conky -c ~/.conky/conkyrc_lunatico


To add Conky Lunatico Rings to startup, open Startup Applications, under "Name" enter "conky" and under "Command", enter this:
conky -p 50 -c /home/YOUR_USERNAME/.conky/conkyrc_lunatico

Where "YOUR_USERNAME" is yes, your username :) This will delay the Conky startup which is required for it to function properly.


For more Conky configurations, check out our Conky tag.

Written by in Web Upd8

Find Us On Facebook

Related Posts Plugin for WordPress, Blogger... Linux Directory