MurrinaPolymer GTK 2.x Theme/Style Ubuntu
This light gray GTK theme aims to be clean and easy to our poor eyes.
Maximising Screen Space In Ubuntu
Squashed for screen space? Whilst my desktop has 1440×900 glorious pixels to fill my netbook sadly doesn’t.
As such I tend to run all my apps maximized on my netbook, I noticed that by removing the title bar from app windows could free up some much needed room – but how do you go about doing it?
Ubuntu Netbook Edition of past shipped with two tools designed specifically for this purpose: Maximus & Window picker applet.
There are drawbacks. Maximus automatically maximizes every window; this can be seen as a boon or a bane but since you can unmaxmize windows if you so wish it shouldn’t get in the way of your workflow to any great extent.
Depending on the screen width you might find the picker gets cramped with too many windows open.
Add the Window Picker to your top panel the traditional way: right click on some empty panel space, choose ‘Add’. In the Applet list that appears double click on ‘Window Picker Applet’.
Finally, move the applet to your desired position.
Window Applets can be installed from the following PPA.
It does give a slick, seamless effect to your desktop, as this screenshot by reader DanielRM shows.
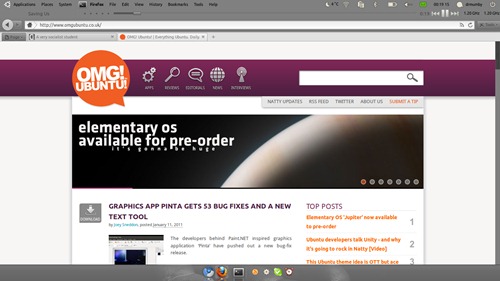
If you’re still game you can find out how to add the simple ‘rule’ using the CompizConfig Settings Manager @ this link.
All methods listed here retain window controls/title bars for non-maximized applications.
As such I tend to run all my apps maximized on my netbook, I noticed that by removing the title bar from app windows could free up some much needed room – but how do you go about doing it?
Ubuntu Netbook Edition of past shipped with two tools designed specifically for this purpose: Maximus & Window picker applet.
Window picker applet & Maximus
These two are an awesome combination, and because of the pickers’ ‘window switching’ feature it allows you to completely dispel with a bottom panel entirely!There are drawbacks. Maximus automatically maximizes every window; this can be seen as a boon or a bane but since you can unmaxmize windows if you so wish it shouldn’t get in the way of your workflow to any great extent.
Depending on the screen width you might find the picker gets cramped with too many windows open.
Installing
Both are ready waiting to be installed in Ubuntu – no PPA or .deb files needed. Just search for ‘Maximus’ and ‘Window Picker’ in Synaptic or click here and here to launch install via the Ubuntu Software Centre.Using
For Maximus to work as intended you will need to add it to your list of start-up applications. To do this head to ‘System > Preferences > Start-up Applications’. Click the ‘Add’ button and enter ‘maximus’ as both name and command.Add the Window Picker to your top panel the traditional way: right click on some empty panel space, choose ‘Add’. In the Applet list that appears double click on ‘Window Picker Applet’.
Finally, move the applet to your desired position.
Window Applets
Another popular choice is gnome panel app ‘Window Applets’. Similar to how Ubuntu Unity handles maximized windows it embeds Window controls in the panel itself for maximised applications.Window Applets can be installed from the following PPA.
sudo add-apt-repository ppa:tsbarnes/miscAdd it to your top panel by right clicking on some empty space, choosing ‘Add’ then selecting ‘Window Applets’ from the applet list. Move to your desired position.
sudo apt-get update && sudo apt-get install gnome-window-applets
Compiz
Removing the ‘title’ bar can also be achieved using Compiz, but without being used in conjunction with a capable window switching tool it can get tricky (read: annoying) to effectively manage open windows.It does give a slick, seamless effect to your desktop, as this screenshot by reader DanielRM shows.
If you’re still game you can find out how to add the simple ‘rule’ using the CompizConfig Settings Manager @ this link.
All methods listed here retain window controls/title bars for non-maximized applications.
Labels:
Guide
Change the way websites look in Firefox
Reader rainstride saw that and got in touch to share something most customization anoraks will have a hard time resisting: the ability to change every font displayed on every website.
Rainstride explains: -
“In Firefox you can change some or all of the normal fonts displayed on websites by going to Firefox’s preferences menu. Then pull up the “content” tab, then under “font’s and colors” you will see a drop down menu, and to the left a button that says “advanced”.”
Click on this and the following window will appear:
“Uncheck the “Allow web pages to choose their own fonts, instead of my selections above” checkbox and click ‘Ok’.
In the “Default font” drop down menu just pick a new font.
“For instance, I use a font called Rufscript on everything. The only thing that will not change are image graphics.”
‘Outsiders’ Emerald window borders
Some things are standard: milk on cereal; Doctor in Tardis; window buttons in frame.
Well, the latter was standard; 0rAX0‘s ‘Outsiders’ Emerald theme pack literally pushes the traditional boundaries away in these off-corner creations.
They certainly look good – but how do they handle? That’s for you to decide.
‘Outsiders’ requires Emerald to be installed and in use as your window decorator.
Download @ 0rax0.deviantart.com/art/Outsiders-Emerald
Subscribe to:
Posts (Atom)