How to customize the font and color of the panel clock in Ubuntu and Linux Mint Mate
If you are using the Mate edition of Linux Mint ( either 13 or 14), the default clock at the right corner will look like this


After that, just hit Alt+F2 and run the following command to reset the bottom panel:
Note: You can edit the font, size and the color code in the .gtkrc-2.0 file to meet your preference.
I will show you a small trick to change the font and color of this clock widget to make it look somehow like this:
The trick is pretty simple. First, you will need to get the Digital font. Just download it here then install it.
Next, create a file named .gtkrc-2.0 in the home folder and copy-paste the following lines into it:
Next, create a file named .gtkrc-2.0 in the home folder and copy-paste the following lines into it:
 style "my-panel-clock"
 {
 fg[NORMAL] = "#272727"
 font_name = "DS-Digital Bold 12"
 }
 widget "*.clock-applet-button.*" style "my-panel-clock"
After that, just hit Alt+F2 and run the following command to reset the bottom panel:
pkill mate-panel
Note: You can edit the font, size and the color code in the .gtkrc-2.0 file to meet your preference.
Ubuntu Got 2 Windows 7 (loader) entries in Grub2
What was the cause of the problem:
Grub2 looks for the Windows boot files for detecting Windows entries. Though you removed Windows 7, the Windows 7 boot files aren't removed (which are "Boot" folder and "bootmgr" file). And as Windows 7 boot files are there, grub2 simply assumes that, there are Windows 7 installation also. Hence the dual entry.
You should find what you're looking for inside of
/boot/grub/grub.cfg. This file is dynamically generated by update-grub2. I am dual booting Ubuntu 32bit and 64bit. If I wanted to remove one, I would simply delete it's section from this file.menuentry 'Ubuntu, with Linux 3.2.0-23-generic' --class ubuntu --class gnu-linux --class gnu --class os {
### BEGIN /etc/grub.d/30_os-prober ###menuentry "Windows 7 (loader) (on /dev/sda1)" --class windows --class os {
insmod part_msdos
insmod ntfs
set root='(hd0,msdos2)'
search --no-floppy --fs-uuid --set=root C08C7F598C7F4944
chainloader +1
}
menuentry "Windows 7 (loader) (on /dev/sda2)" --class windows --class os {
insmod part_msdos
insmod ntfs
set root='(hd0,msdos2)'
search --no-floppy --fs-uuid --set=root C08C7F598C7F4944
chainloader +1
}
menuentry "Windows Recovery Environment (loader) (on /dev/sda4)" --class windows --class os {
insmod part_msdos
insmod ntfs
set root='(hd0,msdos4)'
search --no-floppy --fs-uuid --set=root C22A7EEA2A7EDB3D
drivemap -s (hd0) ${root}
chainloader +1
Changes should take effect immediately, so make a backup and be careful. Also, anything you change in this file will be completely over written if you run
update-grub2 again.make sure you're delete the right one or you'll be sorry...
OR
Mount the
/dev/sda1 drive. Then in that drive look for a folder named Boot and a file named bootmgr. Remove both the folder and file. Then run update-grub2 command again.You might want to install grub2 again. As I see your Ubuntu installation is at
/dev/sdb, the commands will besudo grub-install /dev/sdb
sudo update-grub
Bye..
Open the terminal in a specific size and position in Ubuntu/ Linux Mint
In Ubuntu or Linux Mint and many other distros, when you open the
terminal, the window will appear at the top left corner of the desktop
screen and I usually have to drag it down to the bottom left of the
desktop. If you dont like the default position and size of the start up
window, you can edit it easily.
There are in fact many methods to customize the start up position of the terminal, but in this article I will show you a simple way to do the task without installing anything. In Ubuntu or Linux Mint Cinnamon, just open the terminal and run the following command:
If you use MATE, the command will be
After you hit enter, you will see the properties window of the launcher for the terminal.
 In the command tab, just append this option after the part "mate-terminal" (or "gnome-terminal"):
What this means:
100: the width of the terminal ( in characters)
50: the height ( in lines)
800: x position of the terminal when you open it up
300: y position
Just change the numbers into whatever values you prefer then click on the Close button and everything is done. Next time you open the terminal, the terminal window will appear at the new position instead of the top left corner of the desktop screen
source http://www.linuxandlife.com
There are in fact many methods to customize the start up position of the terminal, but in this article I will show you a simple way to do the task without installing anything. In Ubuntu or Linux Mint Cinnamon, just open the terminal and run the following command:
sudo gnome-desktop-item-edit /usr/share/applications/gnome-terminal.desktopIf you use MATE, the command will be
sudo mate-desktop-item-edit /usr/share/applications/mate-terminal.desktopAfter you hit enter, you will see the properties window of the launcher for the terminal.
--geometry=100x50+800+300What this means:
100: the width of the terminal ( in characters)
50: the height ( in lines)
800: x position of the terminal when you open it up
300: y position
Just change the numbers into whatever values you prefer then click on the Close button and everything is done. Next time you open the terminal, the terminal window will appear at the new position instead of the top left corner of the desktop screen
source http://www.linuxandlife.com
Easy way to download Potenza and install
Potenza was updated on Gnome-look two days ago and this icon set has
been rated positively. All icons in this set have a squircular shape and
the bright colors make Potenza go together with dark GTK themes very
well.
Here are some screenshots of Pontenza

 This is an easy way to download and install
Here are some screenshots of Pontenza
- sudo wget http://mystras.cloudfactory.eu/Downloads/Potenza.deb
- sudo dpkg -i Potenza*
- sudo apt-get install -f
How To Setup Static DNS Servers in Ubuntu
To get started, press Ctrl – Alt – T on your keyboard to open the terminal. When it opens, run the commands below to open dhclient.conf file.

Replace xx and yy with the primary and secondary DNS server addresses. Separate each address with a comma. Save the file and you’re done.
i COPY AND PASTE this from here for my own knowledge.
Then change the line highlighted to:
sudo gedit /etc/dhcp/dhclient.conf
prepend domain-name-servers x.x.x.x, y.y.y.y;

Replace xx and yy with the primary and secondary DNS server addresses. Separate each address with a comma. Save the file and you’re done.
i COPY AND PASTE this from here for my own knowledge.
Install Razor Lightweight Desktop in Ubuntu 12.10 & 12.04
Razor-qt is an advanced, easy-to-use, and fast desktop environment based
on Qt technologies. It has been tailored for users who value
simplicity, speed, and an intuitive interface. Unlike most desktop
environments, Razor-qt also works fine with weak machines.
Razor-qt is a new open-source project, it works with various WMs. This simple tutorial will show you how to install Razor Desktop in Ubuntu using PPA
 Install Razor Desktop from PPA:
Hit Ctrl+Alt+T, copy and paste this command into terminal and hit enter to add the PPA. It supports Ubuntu 12.10, Ubuntu 12.04, 11.10, 11.04, and 10.04.
Log out and select to log in with Razor Desktop:
Razor-qt is a new open-source project, it works with various WMs. This simple tutorial will show you how to install Razor Desktop in Ubuntu using PPA

Hit Ctrl+Alt+T, copy and paste this command into terminal and hit enter to add the PPA. It supports Ubuntu 12.10, Ubuntu 12.04, 11.10, 11.04, and 10.04.
sudo add-apt-repository ppa:razor-qt/ppasudo apt-get update
sudo apt-get install razorqtLog out and select to log in with Razor Desktop:
Ubuntu Builder 2.3.0 Adds Support For Ubuntu 12.10 Quantal Quetzal
Ubuntu Builder has been updated to version 2.3.0 recently which adds support for Ubuntu 12.10 Quantal Quetzal and at the same time drops support for Natty.
Ubuntu Builder is a tool with GUI that allows users to build a
customized version of their Ubuntu-based distributions. The tool allows
to customize either i386 or amd64 OS images.

Ubuntu Builder Installation
Open the terminal and install Ubuntu Builder 2.3.0 in Ubuntu 12.10/12.04 or Linux Mint 13 with the following commands:
sudo add-apt-repository ppa:f-muriana/ubuntu-builder
sudo apt-get update
sudo apt-get install ubuntu-builder
Ubuntu Builder Installation
Open the terminal and install Ubuntu Builder 2.3.0 in Ubuntu 12.10/12.04 or Linux Mint 13 with the following commands:
sudo add-apt-repository ppa:f-muriana/ubuntu-builder
sudo apt-get update
sudo apt-get install ubuntu-builder
Make Unity More Responsive in Ubuntu 12.10 with a Small Tweak
Ubuntu 12.10 has been released and you may have already started
customizing it. Below is a small tweak that will make Unity dash more
responsive.
Ubuntu 12.10 has a 'low graphics mode' that disables some dash and launcher effects like active blur and transparency. It also darkens dash for improved visibility. By sacrificing these effects, you can improve Unity performance.
This low graphics mode is enabled by default in llvmpipe software mode which is used as a fallback method if your system doesn't support 3D hardware acceleration. However, on high end systems, you can enable low graphics mode without getting into fallback renderer.
Low graphics mode can be enabled by adding following line to ~/.xprofile (if the file doesn't exist, create it)
export UNITY_LOW_GFX_MODE=1
Logout, and come back for the effect to take place.
To check if you are running llvmpipe software mode or not, run the following command:
glxgears -info
Low graphics mode changes are mostly same as disabling blur and transparency effects through compiz config settings manager (CCSM). You can use either of these methods to improve Unity performance on your desktop.
Ubuntu 12.10 has a 'low graphics mode' that disables some dash and launcher effects like active blur and transparency. It also darkens dash for improved visibility. By sacrificing these effects, you can improve Unity performance.
This low graphics mode is enabled by default in llvmpipe software mode which is used as a fallback method if your system doesn't support 3D hardware acceleration. However, on high end systems, you can enable low graphics mode without getting into fallback renderer.
Low graphics mode can be enabled by adding following line to ~/.xprofile (if the file doesn't exist, create it)
export UNITY_LOW_GFX_MODE=1
Logout, and come back for the effect to take place.
To check if you are running llvmpipe software mode or not, run the following command:
glxgears -info
In software mode, you will get output like this:
GL_RENDERER = Gallium 0.4 on llvmpipe (LLVM 3.1, 128 bits)
GL_VERSION = 2.1 Mesa 9.1-devel
GL_VENDOR = VMware, Inc.Low graphics mode changes are mostly same as disabling blur and transparency effects through compiz config settings manager (CCSM). You can use either of these methods to improve Unity performance on your desktop.
How To Add The BackTrack Repository To Ubuntu 12.10/12.04/11.10
BackTrack is a Ubuntu-based distribution built mainly for
security testing and is provided for all user levels from beginners to
advanced. The BackTrack distro provides professional users and hackers a
large collection of open source tools and utilities that help in
testing your hardware and network (wireless/wired) for security
vulnerabilities. Their home page can be accessed here if you want to get more information about this Linux distro.
In this tutorial we will help you add the BackTrack repository to Ubuntu so that you can install BackTrack packages natively using "sudo apt-get install package" or from Ubuntu Software Center.
Getting Started
Open the terminal under Ubuntu 12.10/12.04/11.10 or older and run the following commands to add the BackTrack repository:
wget -q http://all.repository.backtrack-linux.org/backtrack.gpg -O- | sudo apt-key add -
sudo sh -c "echo 'deb http://all.repository.backtrack-linux.org revolution main microverse non-free testing' >> /etc/apt/sources.list"
sudo apt-get update
sudo apt-get upgrade
To check if the repository is added correctly, you can try to install this BackTrack package:
sudo apt-get install backtrack-wallpapers
Or you can search BackTrack applications from Ubuntu Software Center:
source http://www.upubuntu.com
Get Nitrux OS - a new awesome icon set for your desktop
Nitrux OS was just uploaded on Gnome-look but it already has a very high rating. According to the author, Nitrux OS will be the default icon theme of the upcoming distro with the same name. The download file is very light, around 2.5 MB but it consists of 5 different sets and all are very awesome.
If the preview image on gnome-look is not enough for you, here are some screenshots of Nitrux OS Dark icons I just installed on my Mint desktop:


If the preview image on gnome-look is not enough for you, here are some screenshots of Nitrux OS Dark icons I just installed on my Mint desktop:


You can click here to directly download this beautiful icon set here from gnome-look. If you are using Ubuntu or any other Ubuntu-based distro, you can open the terminal and run the following commands to install it from the PPA:
sudo add-apt-repository ppa:upubuntu-com/themes
sudo apt-get update
sudo apt-get install nitruxos
sudo apt-get update
sudo apt-get install nitruxos
source: http://www.linuxandlife.com/
How To Vpn Setting For Ubuntu

For the settings:
1) Download your key from your VPN provider
2) Extract the file ( usually .zip)

3) Open your connection manager, choose VPN Connection

4) Click Configure VPN , under VPN tab click Import
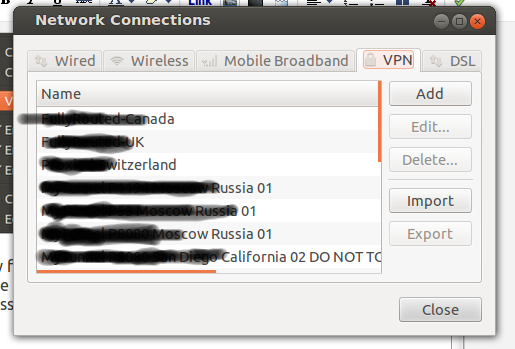
5) Find your extracted VPN key folder, where ever you put it, double click..
sometimes your provider give full certificate, some provider want you to
key in your username and password

6) Click Save.
For the connection
1) Open your Connection Manager
2) Choose VPN Connection
3) Choose your server and wait, if you got failure try another server until you succeed.
Enjoy your VPN Connection...
( mind my english)
Ubuntu 12.10 Simplifies GRUB Boot Menu
Ubuntu 12.10 features a minor but interesting change in GRUB2 Boot Menu.
Menu entries now have 'Ubuntu' as the first option instead of 'Ubuntu with Linux (Kernel version)'. Everything else has been tucked into a new 'Advanced Options' entry which lists older Kernels and recovery mode options.
Here is a screenshot of new boot menu:


For comparison, here is a screenshot of boot menu in Ubuntu 12.04:
New boot menu makes sense as any first time Linux user may get confused by recovery mode option and Kernel versions. A simple 'Ubuntu' entry is enough to tell a user what to do in case he is presented with a boot menu.
By default GRUB menu is hidden and it is only shown when a system fails to shut properly or Shift key is held during boot time.
Menu entries now have 'Ubuntu' as the first option instead of 'Ubuntu with Linux (Kernel version)'. Everything else has been tucked into a new 'Advanced Options' entry which lists older Kernels and recovery mode options.
Here is a screenshot of new boot menu:

Advanced Options:

New boot menu makes sense as any first time Linux user may get confused by recovery mode option and Kernel versions. A simple 'Ubuntu' entry is enough to tell a user what to do in case he is presented with a boot menu.
By default GRUB menu is hidden and it is only shown when a system fails to shut properly or Shift key is held during boot time.
Sway Black-Base ORANGE: A Nice Dark GTK3 Theme for Unity and Gnome Shell - Ubuntu 12.04/Linux Mint 13 (Maya).
Sway Black-Base ORANGE is an elegant GTK3 theme that uses a striking combination of black and orange colors. The theme can be enabled under Unity and Gnome Shell. Here is a screenshot of Sway Black-Base ORANGE under Ubuntu 12.04 (Unity):

Sway Black-Base ORANGE Installation
To install this theme under Ubuntu 12.10/12.04/11.10 or Linux Mint 13 (Maya), open the terminal and issue these commands:
sudo add-apt-repository ppa:upubuntu-com/gtk3
sudo apt-get update
sudo apt-get install sway-black-orange
You can use Gnome Tweak Tool to enable it, or run these two commands:
gsettings set org.gnome.desktop.interface gtk-theme 'Sway Black-Base ORANGE'
gconftool-2 --set --type string /apps/metacity/general/theme 'Sway Black-Base ORANGE'
Theme source: gnome-look
Install Latest Build of Terminator from PPA

Terminator allows users to have multiple terminals in one window and use key bindings to switch between them. It provides an efficient way of filling a large area of screen space with terminals.
Some new features and fixes have been included in Terminator since its last release, so I have packaged it into a PPA.
Changes:
- Auto-resize columns/rows: Double clicking on a splitter evenly redistributes columns/rows in that grouping
- It is now possible to rename multiple windows of Terminator using a keyboard shortcut
- You can now add a keyboard shortcut for inserting terminal numbers
- Added possibility to rotate the paned containers. Super + R for rotating terminals clockwise and Super + Shift + R for rotating terminals counter-clockwise
- Fixed, titlebars not refreshing when using some keyboard shortcuts
- Fixed initial terminal sizing with non-default font sizes
- Many other fixes
sudo add-apt-repository ppa:niteshgupta16/ubuntuvibes
sudo apt-get update
sudo apt-get install terminator
Some new features and fixes have been included in Terminator since its last release, so I have packaged it into a PPA.
Get malys ex - new elegant and stylish icon set by Jonny Malys
Malys -ex is the newest icon set created by the prolific artist Jonny Malys. The main style of this icon set is a spherical symbol inside a square with nice color combination.
Here is a screenshot of this beautiful icon set:
 To install Malys -ex, you can just download it here then extract the icon folder to /usr/share/icons.
If you are using Ubuntu or Linux Mint, just open the terminal and run this command to install Malys -ex from the PPA
Here is a screenshot of this beautiful icon set:

If you are using Ubuntu or Linux Mint, just open the terminal and run this command to install Malys -ex from the PPA
 sudo add-apt-repository ppa:noobslab/icons
 sudo apt-get update
sudo apt-get install malys-exProblem With Font Color In Ubuntu 12.04
Sometimes when you change setting to make your themes nicer, it makes your fonts can't easily read. I found this solution.
All your setting will lost but you'll get the contrast.
Enjoy.
mv /home/user/.config/dconf/user /home/user/.config/dconf/user.old All your setting will lost but you'll get the contrast.
Enjoy.
Subscribe to:
Posts (Atom)