Showing posts with label themes. Show all posts

Easy way to download Potenza and install

Potenza was updated on Gnome-look two days ago and this icon set has been rated positively. All icons in this set have a squircular shape and the bright colors make Potenza go together with dark GTK themes very well.

Here are some screenshots of Pontenza

 This is an easy way to download and install
  • sudo wget http://mystras.cloudfactory.eu/Downloads/Potenza.deb
  • sudo dpkg -i Potenza*
  • sudo apt-get install -f

Sway Black-Base ORANGE: A Nice Dark GTK3 Theme for Unity and Gnome Shell - Ubuntu 12.04/Linux Mint 13 (Maya).

Sway Black-Base ORANGE is an elegant GTK3 theme that uses a striking combination of black and orange colors. The theme can be enabled under Unity and Gnome Shell. Here is a screenshot of Sway Black-Base ORANGE under Ubuntu 12.04 (Unity):


Sway Black-Base ORANGE Installation

To install this theme under Ubuntu 12.10/12.04/11.10 or Linux Mint 13 (Maya), open the terminal and issue these commands:

sudo add-apt-repository ppa:upubuntu-com/gtk3
sudo apt-get update
sudo apt-get install sway-black-orange


You can use Gnome Tweak Tool to enable it, or run these two commands:

gsettings set org.gnome.desktop.interface gtk-theme 'Sway Black-Base ORANGE'

gconftool-2 --set --type string /apps/metacity/general/theme 'Sway Black-Base ORANGE'


Theme source: gnome-look

Install GnomishDark theme on Ubuntu 12.04/11.10/Linux Mint 13/12 (GTK3 + Gnome Shell)

This is a clean dark theme for GTK3, based on Adwaita (provided by gnome-themes-standard), plus a matching GNOME-Shell theme. This theme works with Gnome shell, Gtk3.

1st Install nouveGnome Gray Icons then install theme.

To install GnomishDark theme on Ubuntu/Linux Mint open Terminal (Press Ctrl+Alt+T) and copy the following commands in the Terminal:

  • mkdir ~/.themes
  • wget -O GnomishDark.zip http://dl.dropbox.com/u/53319850/NoobsLab.com/GnomishDark.zip
  • unzip GnomishDark.zip -d ~/.themes && sudo rm GnomishDark.zip
That's it, Enjoy

An Amazing Wood Theme For Gnome Desktops - Ubuntu 12.04/11.10

If you are attracted to brown themes, you can really enjoy this wood theme that is available for Gnome desktops. In this tutorial, we will help you install it under Ubuntu 12.04/11.10. Here is a screenshot of this wood theme under Ubuntu 12.04:


Installation

Start the terminal and run these commands:

sudo add-apt-repository ppa:upubuntu-com/themes
sudo apt-get update
sudo apt-get install wood-theme

To enable it, run these commands:

gsettings set org.gnome.desktop.interface gtk-theme 'wood-theme'

gconftool-2 --set --type string /apps/metacity/general/theme 'wood-theme'

Malys Black/Blue Icons Updated to version 1.5 for Ubuntu/Linux Mint via PPA

Install Malys Blue/Black Icons on Ubuntu 12.10/12.04/11.10/11.04/10.10/10.04/Linux Mint/or any Ubuntu based Distribution

Malys UniBlue/UniBlack Icons updated to ver1.5 and added new icons in this version. For other distro's check source links.
Install Tools to change icons: Gnome-Tweak-ToolUbuntu-Tweak

Malys UniBlue Icons


To install Malys-Uniblue-Icons on Ubuntu/Mint open Terminal (Press Ctrl+Alt+T) and copy the following commands in the Terminal:

  •   sudo add-apt-repository ppa:noobslab/icons
  •   sudo apt-get update
  •   sudo apt-get install malys-blue-icons

Malys UniBlack Icons 


 To install Malys-UniBlack-Icons on Ubuntu/Mint open Terminal (Press Ctrl+Alt+T) and copy the following commands in the Terminal:


  • sudo add-apt-repository ppa:noobslab/icons 
  • sudo apt-get update 
  • sudo apt-get install malys-black-icons


Google Plus Gnome Shell Theme


Half-left has designed another great Gnome Shell theme and this time it is based on the look and feel of the social network website, Google+.


Instructions

Make sure you have user-theme-extension installed. Load the GNOME Tweak Tool (available in Ubuntu Software Center) and go to "Theme" section. Click the Shell Theme box and locate the zip file downloaded from link above. Select the theme in the drop down box.


source:  http://www.ubuntuvibes.com

Install Black-Amber Theme, Dragon-Equinox Theme, Gnombiance Theme in Ubuntu 11.10 Oneiric Ocelot/Linux Mint 12 Lisa (Gtk 2/3, Gnome Shell, Unity)

First of all install Gnome Tweak Tool to change Theme and Icons.

1 - Dragon Equinox

Dragon Equinox Theme is Compatible with (Gnome Shell 3.2.1 - 3.2.2.1/GTK3/GTK2)
1st Download Theme Wallpaper
2nd Install Awoken Dark Icons

To Install Theme on Ubuntu/Linux Mint open Terminal (Press Ctrl+Alt+T) and copy the following commands in the Terminal:

  • sudo add-apt-repository ppa:noobslab/themes
  • sudo apt-get update
  • sudo apt-get install dragon-equinox-extension dragon-equinox-theme

2 - Gnombiance Theme


Gnombiance Theme is Compatible with (Gnome Shell 3.2.1 - 3.2.2.1/GTK3/GTK2)
1st Download Theme Wallpaper
2nd Install Faenza Icons

To Install Theme on Ubuntu/Linux Mint open Terminal (Press Ctrl+Alt+T) and copy the following commands in the Terminal:

  • sudo add-apt-repository ppa:noobslab/themes
  • sudo apt-get update
  • sudo apt-get install gnombiance-theme gnombiance-extension

3 - Black Amber Theme


Black Amber Theme is Compatible with (Gnome Shell 3.2.1 - 3.2.2.1/GTK3/GTK2)
1st Download Theme Wallpaper
2nd Install Awoken White Icons
3rd Some theme tweaks open Terminal and enter following commands:
Following commands for lightdm:

  • wget http://dl.dropbox.com/u/53319850/NoobsLab.com/unity-greeter.conf.zip
  • unzip unity-greeter.conf.zip -d /etc/lightdm
Following commands for Unity Greeter:
  • wget http://dl.dropbox.com/u/53319850/NoobsLab.com/unity-greeter.zip
  • unzip unity-greeter.zip -d /usr/share/unity-greeter
Following commands for Unity Start Orb:
  • wget http://dl.dropbox.com/u/53319850/NoobsLab.com/unity-start-orb.zip
  • unzip unity-start-orb.zip -d /usr/share/unity/4

To Install Theme on Ubuntu/Linux Mint open Terminal (Press Ctrl+Alt+T) and copy the following commands in the Terminal:
  • sudo add-apt-repository ppa:noobslab/themes
  • sudo apt-get update
  • sudo apt-get install black-amber-theme black-amber-extension

Nord: A Beautiful Glassy GNOME Shell Theme

Nord is a new glassy GNOME Shell theme based on Zukitwo, created by WebUpd8 reader rAX.

The theme is currently in beta and there are some known bugs but it already looks great, featuring some unique elements like the switches which look amazing (see the screenshots). If you use GNOME Shell, you must really give it a try!


Here are a few screenshots:

Nord GNOME Shell theme

Nord GNOME Shell theme

Nord GNOME Shell theme

Nord GNOME Shell theme


To use Nord, either extract it in the ~/.themes/ folder and use GNOME Tweak Tool or ThemeSelector GNOME Shell extension to apply the theme or rename the extracted folder from "gnome-shell" to "theme" and replace the /usr/share/gnome-shell/theme folder.

Download Nord GNOME Shell theme

Written by in Web Upd8

5 Beautiful Plank Themes

Plank is new dock for Linux written in Vala, developed by the Docky team.

1. Glass Pill:


Glass Pill Plank theme


2. Ubuntu Panel:

Plank Ubuntu Panel theme


3. HUD:

Plank HUD theme


4. Froyo:

Plank Froyo theme


5. Rounded Glass:

Plank Rounded Glass theme


Usage


To install Plank in Ubuntu, use the commands below (this will add the Plank/Docky testing PPA):
sudo add-apt-repository ppa:ricotz/docky
sudo apt-get update
sudo apt-get install plank

The above PPA is available for Ubuntu Oneiric, Natty and Maverick.


To use a theme, make a backup of the original Plank theme under ~/.config/plank/theme/ and then extract the downloaded theme into this folder (~/.config/plank/theme/), replacing the already existing files. Note: ~/.config/ is a hidden folder in your home directory so press CTRL + H to see it.


Themes thanks to Cassidy James; via elementaryositdev

Written by in Web Upd8

New GNOME 3 Icon Theme By Tiheum: Faience

Faience icon theme

Tiheum, who is best known for the Faenza icon theme and Equinox GTK themes has started working on a new icon theme for GNOME 3 / GNOME Shell called "Faience". The theme is work in progress (this is the first public release) and it currently depends on the original Faenza for many icons, but it looks really promising and it already comes with 3 folder color variations.


Faience azur icon theme
(Faience Azur)

Faience Ocre
(Faience Ocre)

Faience icon theme is especially designed for GNOME Shell so it's not recommended to use it with Unity / GNOME 2.


Tiheum is also working on a GNOME Shell and GTK2/3 theme which will complete the "Faience" pack. The GTK2/3 theme is not yet available but you can already use the Faience GNOME Shell theme:

Faience GNOME Shell theme
(Faience GNOME Shell theme and the original Faience folder icons)


Installation


Faience icon theme


To use Faience, you must firstly install the Faenza icon theme. If you run Ubuntu, you can install it from its official PPA using the commands below:
sudo add-apt-repository ppa:tiheum/equinox
sudo apt-get update
sudo apt-get install faenza-icon-theme

Alternatively, download Faenza icon theme from DeviantArt, extract the downloaded archive and copy it to the ~/.icons folder.

Faience is not yet available in the above PPA so to install it, download the archive and copy all the 3 folders (Faience, Faience-Azur and Faience-Ocre) to the ~/.icons directory (if this folder doesn't exist, create it), then use GNOME Tweak Tool to apply the icon theme:

Gnome Tweak Tool


Faience GNOME Shell theme


To use the Faeience GNOME Shell theme, download it from HERE, extract it to the ~/.themes folder and use GNOME Tweak Tool to apply it. If for whatever reason you don't want to use GNOME Tweak Tool (like... you can't install the user-theme extension which is required by this feature), just remove all the files under /usr/share/gnome-shell/theme and copy the Faience GNOME Shell theme files to this folder.


Download: Faience icon theme | Faience GNOME Shell theme


Written by in Webupd8

Rotate Your GNOME/Xfce Wallpapers With DesktopNova


Every operating system is customizable to a certain extent.  Some, such as Linux, offer an incredibly wide variety of icons and themes, with others, like Mac OSX, not offering much at all.  One option all operating systems have, however, is the ability to change the desktop background picture, or wallpaper.  In this instance, Mac OSX shines, as it offers the ability to rotate through a folder full of images at preset intervals, so you’re never looking at the same image for longer than you want.

Linux and Windows, however, don’t offer this ability, at least not by default.  There are utilities available for both that have this feature, and in this article we’ll be talking about DesktopNova, a utility for Linux.

DesktopNova, as mentioned, doesn’t come installed by default (or at least not in Ubuntu or other popular distributions), but Debian and Ubuntu users will find it already in their software repositories. Other Linux distributions will need to check their package manager, or download the source code from this page.
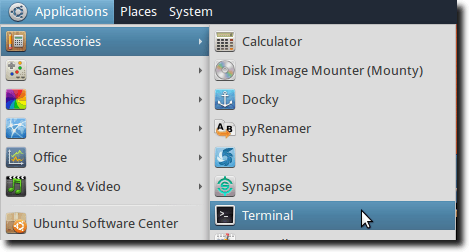
In Ubuntu, the quickest way to install DesktopNova is from the Terminal.  So first, go to the Applications menu, then Accessories.

Open Terminal

Next, type the following command: sudo apt-get install desktopnova desktopnova-module-gnome desktopnova-tray

note: in the above command, installing desktopnova-module-gnome enables desktopnova for linux distributions running the gnome desktop.  there is also an xfce module, so xubuntu users should install desktopnova-module-xfce instead.  desktopnova will not run without one or the other being installed.
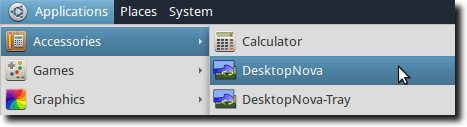
Once installed, you’ll find two DesktopNova entries in the same Accessories menu where you found the Terminal.

Open DesktopNova

To get started, open the first option, leaving DesktopNova-Tray alone (for now).
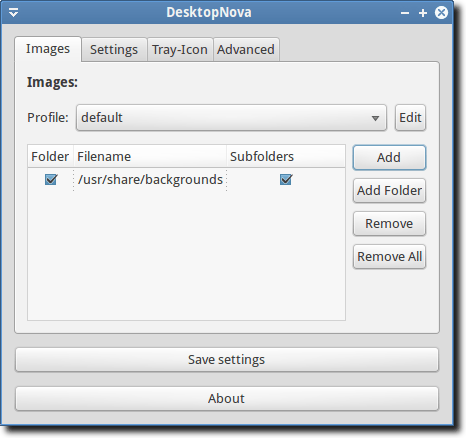
When you open DesktopNova, you’ll see a single window with four tabs.  The Images tab is first.

Select Images or Folder

Here is where you can create profiles (for different users, themes or occasions), as well as how you identify which images or folders will be used.
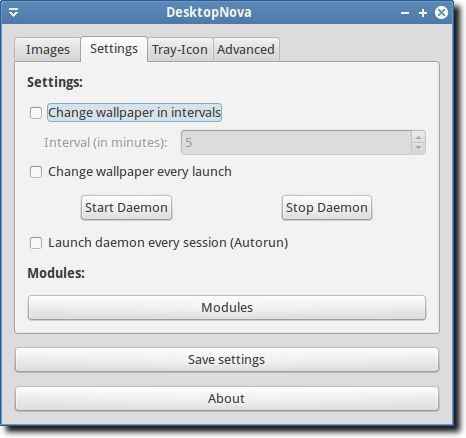
The second tab, called Settings, is just that.

Session Options

It offers the ability to set the wallpaper change interval, whether or not DesktopNova should change your wallpaper every time you launch it (even if the change interval isn’t complete), and whether DesktopNova should autostart with your computer.
Third is the Tray-Icon tab.

Tray Icon Options

There are only two options here: first is whether or not to start the DesktopNova-Tray application at launch (which allows you to change the wallpaper manually), and whether mouse scrolling through your wallpaper choices should be turned off or on.
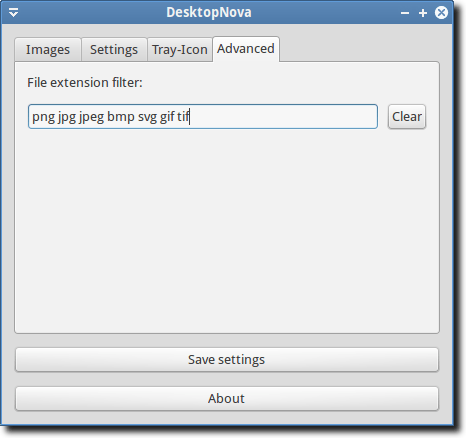
Finally, the Advanced tab.

Image Type Filter

Here you can type in as many file extension types as you want.  The ones you have listed will be shown, those you leave out will be ignored.  So if you have duplicate images in your folder, some in PNG and others saved as JPG, you can have DesktopNova show only one or the other, so you don’t get repeats as often.
As mentioned, the DesktopNova-Tray application allows you to move forward or backward between images, just with a couple clicks (or a flick of the mouse wheel).

Tray Icon

You can also access the DesktopNova preferences, see the about screen, or quit the tray icon entirely. DesktopNova isn’t an incredibly complex program.  It basically mimics the desktop wallpaper slideshow ability already present in GNOME, but allows you to choose images from different locations, and without editing any XML files.  It’s simple, but useful, and that should make it a nice addition for most Linux users.

how to install XFCE on Ubuntu 11.04


Installing XFCE Desktop on Ubuntu 11.04

step1 : Open terminal and type (You may need to authenticate yourself by login password):
sudo apt-get update
sudo apt-get install xfce4
step2 : Wait until the installation is complete. Next, logout from the current session and select Xfce session in login prompt.
step3 : That’s all.. Enjoy XFCE.. if you want to use other desktop then just select it at the login prompt.

Bigisi Themes For Ubuntu

showtimebalanzaninfinity wild-shineexotictropical bamboo zenstep-into-freedomsunrise
aquadreams aquadreams

Link to our launchpad page: https://launchpad.net/bisigi-project

1 – Add the repository

It’s easier than in previous ubuntu versions! Open a terminal and do:

sudo add-apt-repository ppa:bisigi/ppa && sudo apt-get update    

if the server doesn’t respond, just wait a few minutes and try again

2 - Install Themes

Then install themes: (this command install all themes. If you want to install only one theme, go look here)

sudo apt-get install bisigi-themes 
or click on apt://bisigi-themes


List of commands to install specific themes:


AquaDreams:                    sudo aptitude install aquadreams-theme
Ubuntu Sunrise:                sudo aptitude install  ubuntu-sunrise-theme
Bamboo-Zen:                    sudo aptitude install bamboo-zen-theme

Step into Freedom:            sudo aptitude install step-into-freedom-theme

Tropical:                           sudo aptitude install tropical-theme

Exotic:                              sudo aptitude install exotic-theme

Balanzan:                          sudo aptitude install balanzan-theme
Wild Shine:                       sudo aptitude install wild-shine-theme
Infinity:                            sudo aptitude install infinity-theme
Showtime:                        sudo aptitude install showtime-theme
Orange:                            sudo aptitude install orange-theme
Ellanna:                            sudo aptitude install ellanna-theme
AirLines:                           sudo aptitude install airlines-theme

Eco:                                 sudo aptitude install eco-theme
Split:                                sudo aptitude install split-theme 

 
Select wallpaper resolution during installation

During the installation of certain themes a window will ask you to choose the resolution of your screen.
- 16/10: For the following resolutions: 1280×800 / 1440×900 / 1680×1050 / 1920×1200 / 2560×1600. For HD 16/9 screens:  1366×768 / 1920×1080,  use this option too
- 4/3: For the following resolutions: 800×600 / 1024×768 / 1280×1024  / 1600×1200


Find Us On Facebook

Related Posts Plugin for WordPress, Blogger... Linux Directory